
Do you want to learn exactly how to submit XML sitemap to Google, Bing, and Yandex search engines?
An XML sitemap helps search engines discover the important pages on your WordPress website, including new posts and recently updated content.
While search engines can often find your pages through internal links and other sources, submitting your sitemap directly gives them another way to discover and crawl your content.
Many website owners submit their sitemap to Google Search Console and stop there. However, Google isn’t the only search engine your audience may use. Bing and Yandex also serve users in different markets, so submitting your sitemap to multiple search engines can help expand your website’s visibility.
The good news is that submitting an XML sitemap doesn’t take much time. Once you know where your sitemap is located, you can submit it to Google Search Console, Bing Webmaster Tools, and Yandex Webmaster in just a few steps.
In this guide, you’ll learn how to find your WordPress XML sitemap, submit it to all three search engines (Google, Bing, and Yandex), check whether your sitemap was processed successfully, and fix common issues that may prevent search engines from accessing it. We’ll also share tips to help search engines discover your new and updated content more efficiently.
Table of Contents
Understanding What an XML Sitemap Does
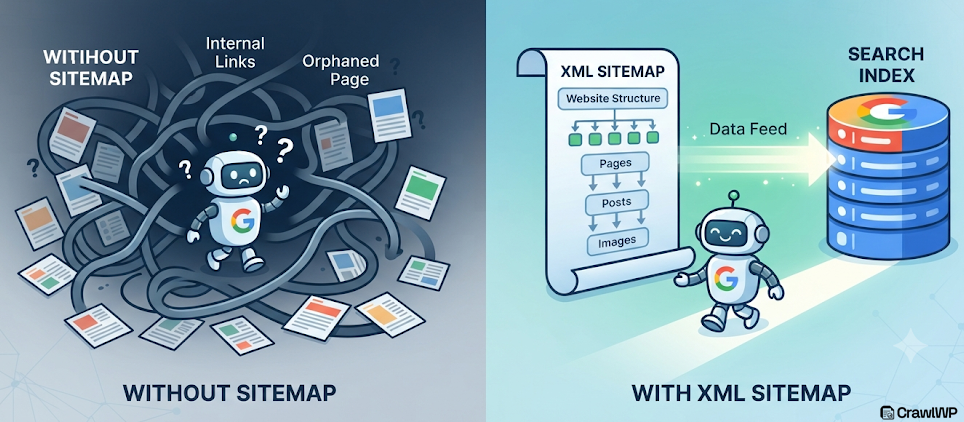
Before you submit your XML sitemap to Google, Bing, or Yandex, it’s helpful to understand what it is and why it matters.
An XML sitemap is a file that lists the important pages on your WordPress website for search engines to discover and crawl. Think of it as a roadmap that points search engines to your posts, pages, products, categories, and other content, making it easier for them to understand your site’s structure.
While search engines can discover pages by following links from other websites and within your own site, that process isn’t always fast or complete. This is especially true for new websites, websites with many pages, or sites with few backlinks.
When you submit your website’s XML sitemap to search engines, you give them a direct path to your content, helping them find new and updated pages more efficiently.
An XML sitemap can also include useful information about your content, such as when a page was last updated. This helps search engines know when they should revisit your pages to look for changes.
Now that you understand what an XML sitemap is and how it helps search engines discover your content, the next question is: where should you submit it?
Many WordPress users only submit their sitemap to Google Search Console, assuming that’s enough. While Google is the largest search engine, it’s not the only one your audience may use. Submitting your sitemap to additional search engines can help expand your site’s visibility and ensure your content reaches a wider audience.
Let’s look at why it’s worth submitting your website XML sitemap to Google, Bing, and Yandex.
Why You Should Submit Your Sitemap to Multiple Search Engines
Submitting your sitemap to multiple search engines offers several benefits, including:
Faster Content Discovery: Search engines rely on sitemaps to find new pages and updates more efficiently. When you submit your sitemap directly, you notify each search engine that your website exists and where to find your content. This can reduce the time it takes for newly published or updated pages to appear in search results.
Reach a Wider Audience: Although Google dominates the search market, millions of people still use other search engines every day. Microsoft Bing powers search results for platforms and services such as Yahoo Search, Microsoft Edge, Windows Search, ChatGPT, and Microsoft Copilot. Reaching these users can bring additional traffic that you might otherwise miss.
Better Indexing Coverage: Search engines don’t always crawl and index websites in the same way. A page that takes longer to appear in one search engine may be indexed more quickly by another. Submitting your sitemap directly provides search engines with the information they need to crawl your site, increasing the likelihood that all your important pages are discovered and indexed.
Access to webmaster insights: Google Search Console, Bing Webmaster Tools, and Yandex Webmaster provide reports that help you monitor your sitemap, identify crawling issues, and track your website’s indexing status.
How to Find Your XML Sitemap URL in WordPress
Your XML sitemap URL is the address you’ll submit to Google so it can discover and crawl your content more efficiently.
Fortunately, most WordPress websites already have an XML sitemap automatically generated. The exact sitemap URL depends on whether you’re using WordPress’s built-in sitemap feature or an SEO plugin such as Yoast SEO, Rank Math, or All in One SEO.
Below are the most common sitemap URLs for WordPress websites:
- Default WordPress Sitemap: yoursite.com/wp-sitemap.xml
- WordPress with Yoast: yoursite.com/sitemap_index.xml
- WordPress with Rank Math: yoursite.com/sitemap_index.xml
- WordPress with AIOSEO: yoursite.com/sitemap.xml
Regardless of which plugin or sitemap method you’re using, it’s a good idea to verify that your sitemap is accessible before submitting it to Google.
To do this, open your sitemap URL in a browser. If your sitemap is functioning correctly, you’ll see either:
- A list of sitemap files, or
- A list of URLs included in the sitemap.
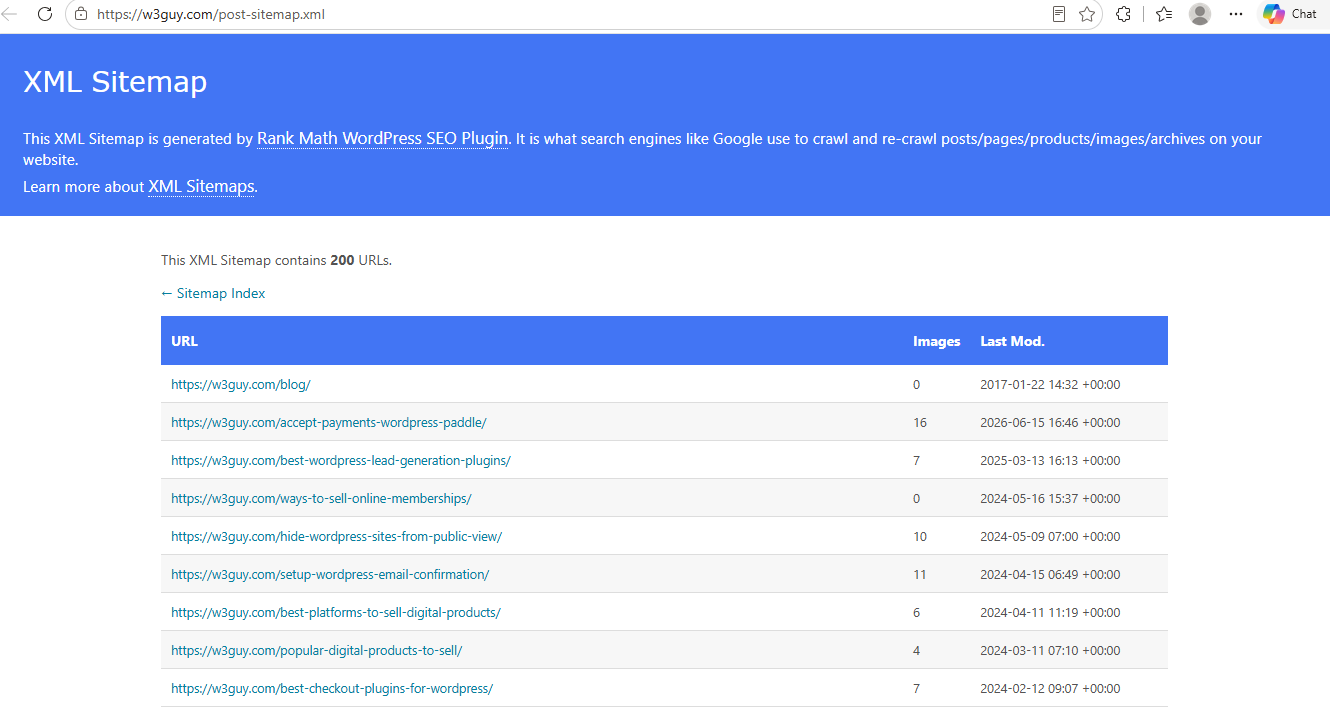
Now that you’ve located your XML sitemap URL, you’re ready for the next step: submitting it to Google Search Console.
How to Submit an XML Sitemap to Google Search Console
Google Search Console is a free service from Google that allows website owners to monitor their site’s presence in Google Search, view indexing data, identify crawling issues, and submit sitemaps.
If you have already verified your website in Google Search Console, you can skip ahead to the next section.
If not, follow the steps below.
Step 1: Sign in to Google Search Console
Start by visiting Google Search Console and signing in with the Google account you want to use to manage your website.
After signing in, click the Add Property button from the property selector menu.
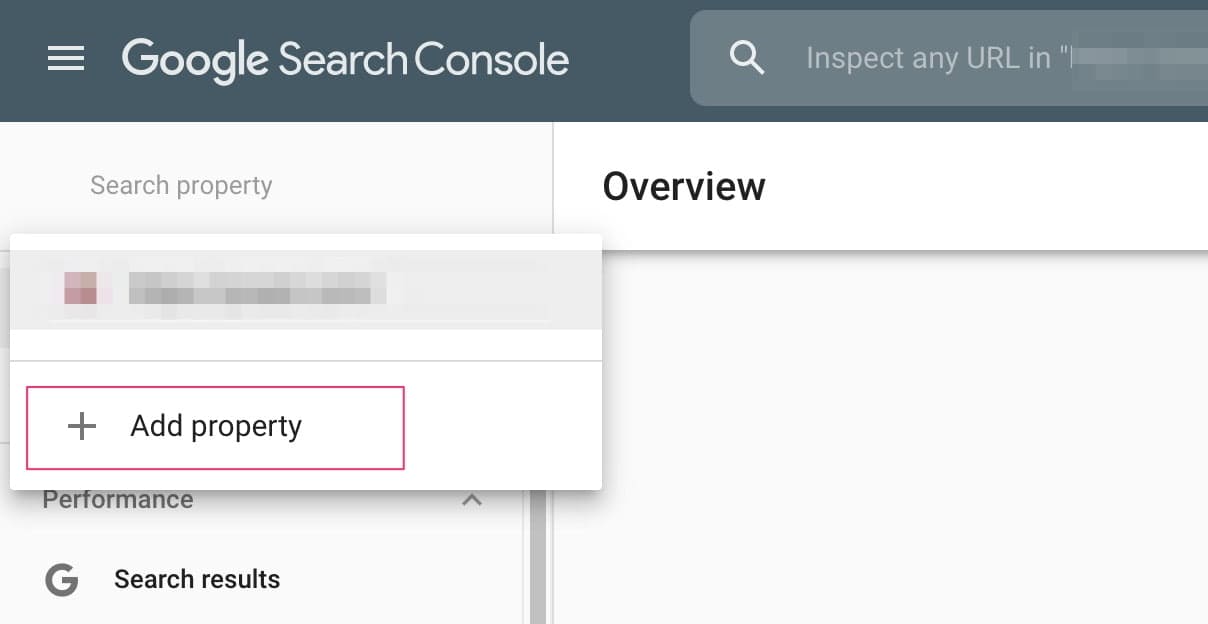
Google will then ask you to choose between two property types:
- Domain Property: This covers your entire domain, including all subdomains and protocols such as HTTP and HTTPS, as well as the www and non-www versions.
- URL Prefix Property: This covers only URLs that match the exact URL prefix you provide.
Both options work well, and the choice depends on your preference. The Domain option provides broader coverage but requires DNS verification, which can be more technical for some users.
For this guide, we’ll use the URL Prefix option.
When adding your property, make sure you enter your website address exactly as it appears in your browser. For example, if your website uses “https://yourdomain.com/”, you should enter that complete URL, including the “https://” and the trailing slash (/).
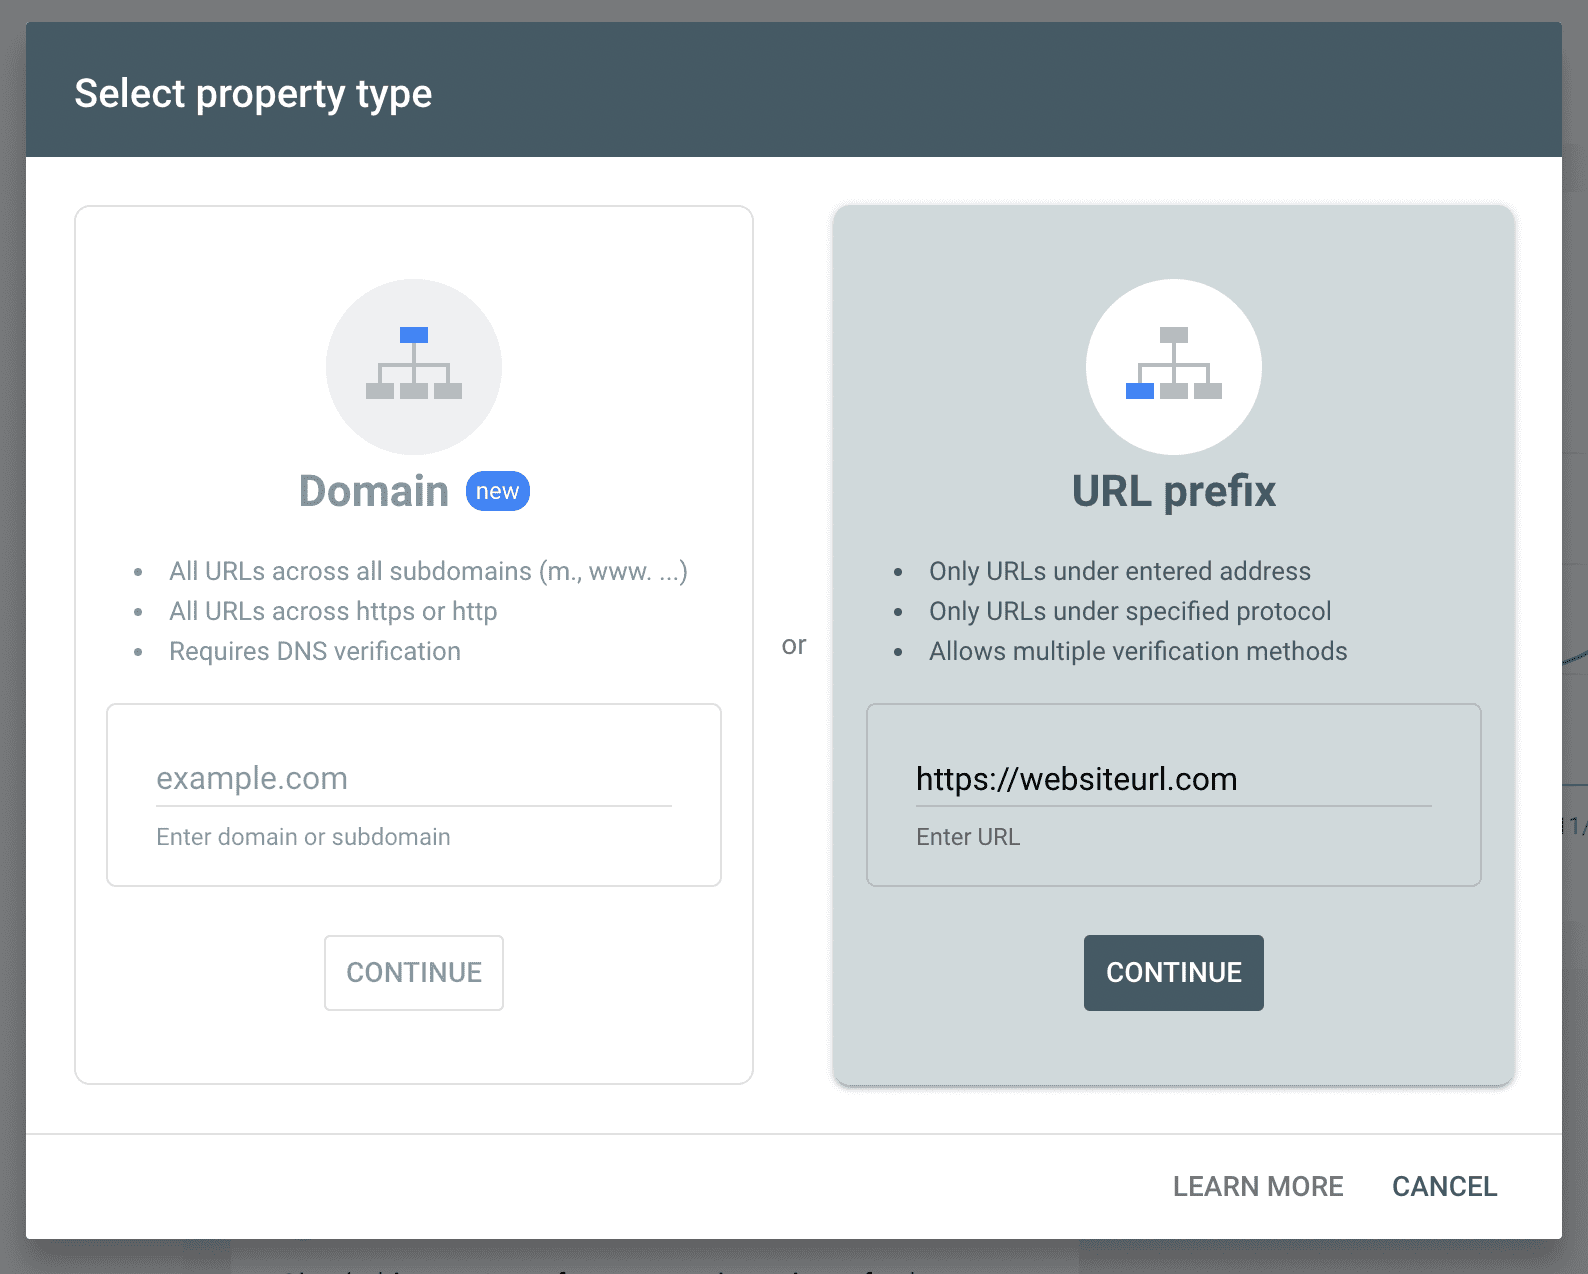
After adding your website, Google will ask you to verify ownership. Select the HTML tag verification method.
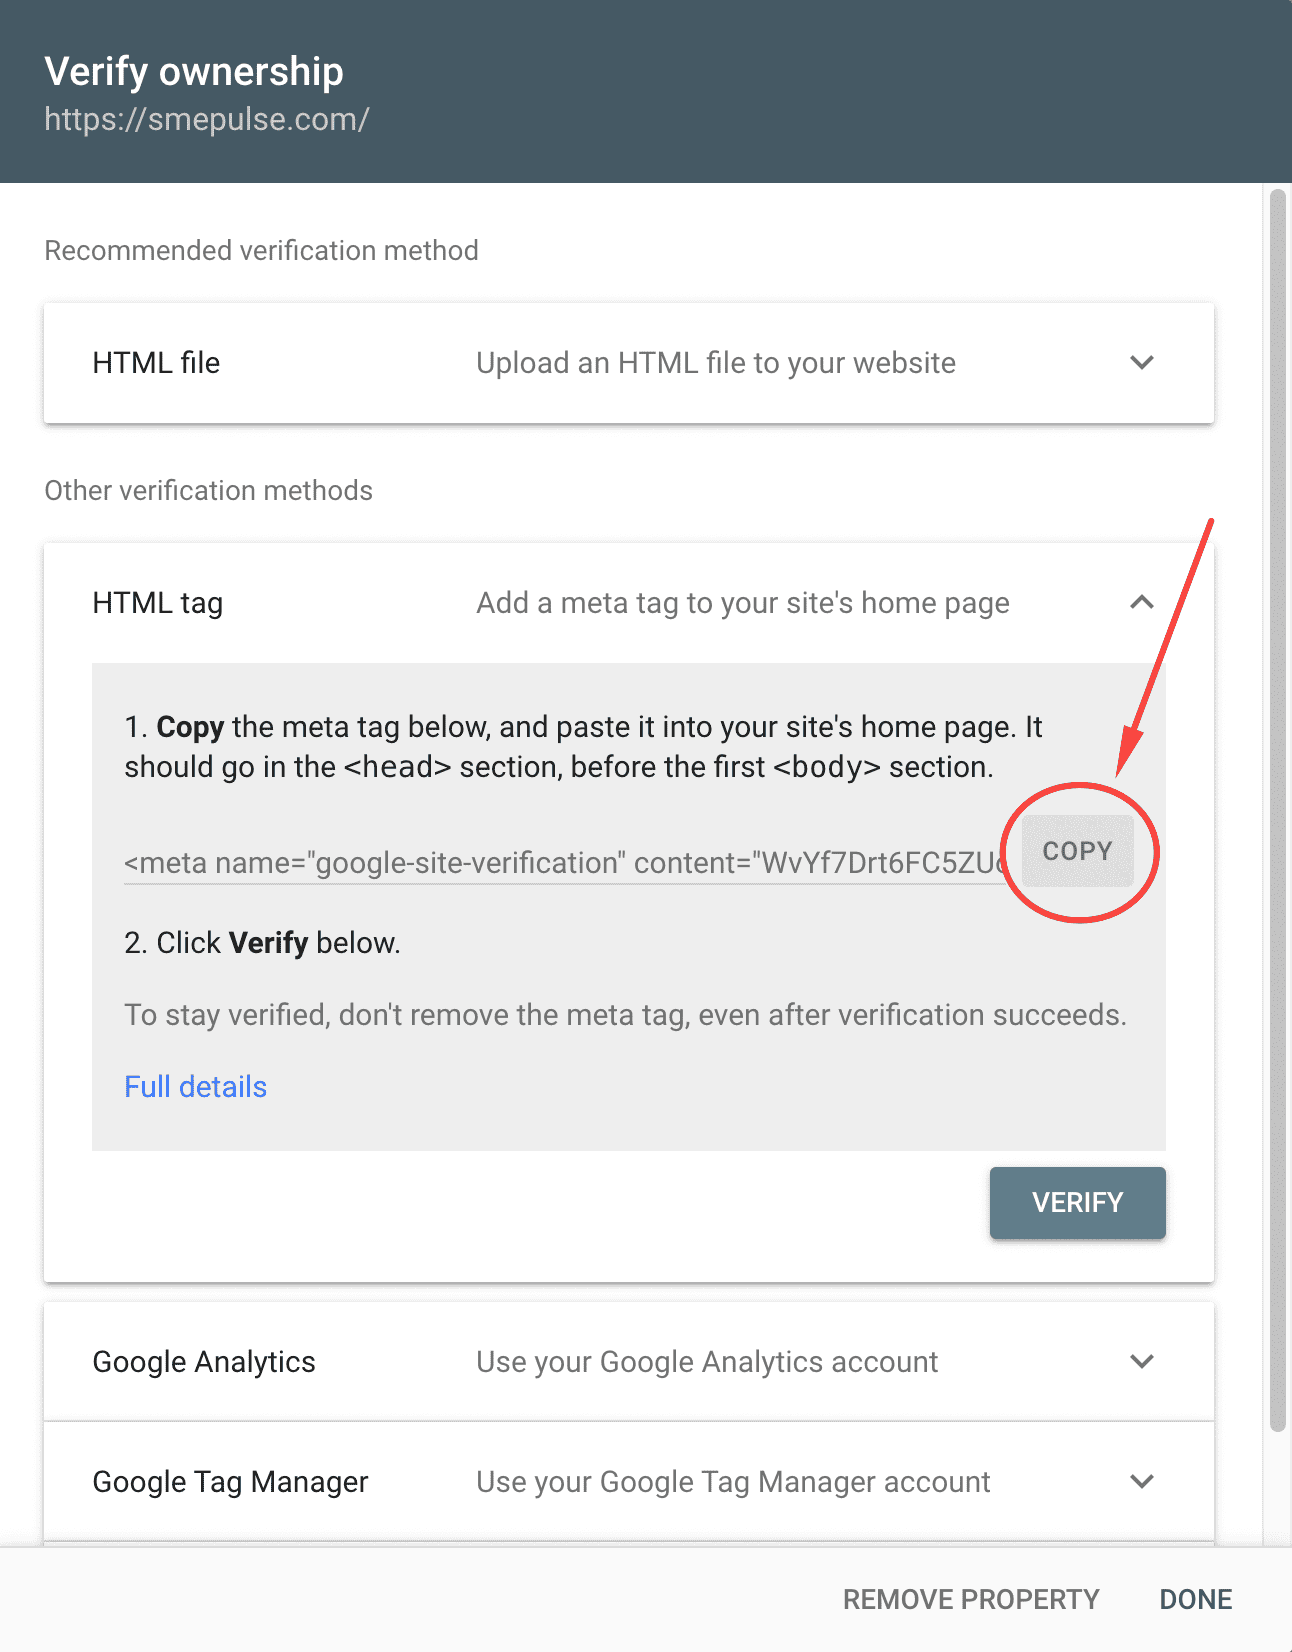
Next, copy the meta tag provided by Google.
Step 2: Add the Google Verification Meta Tag to WordPress
After copying the meta tag provided by Google, log in to your WordPress admin dashboard and navigate to: CrawlWP > Settings > Advanced > Site Verification.
Paste the copied verification code into the Google Verification Code field and save your changes.
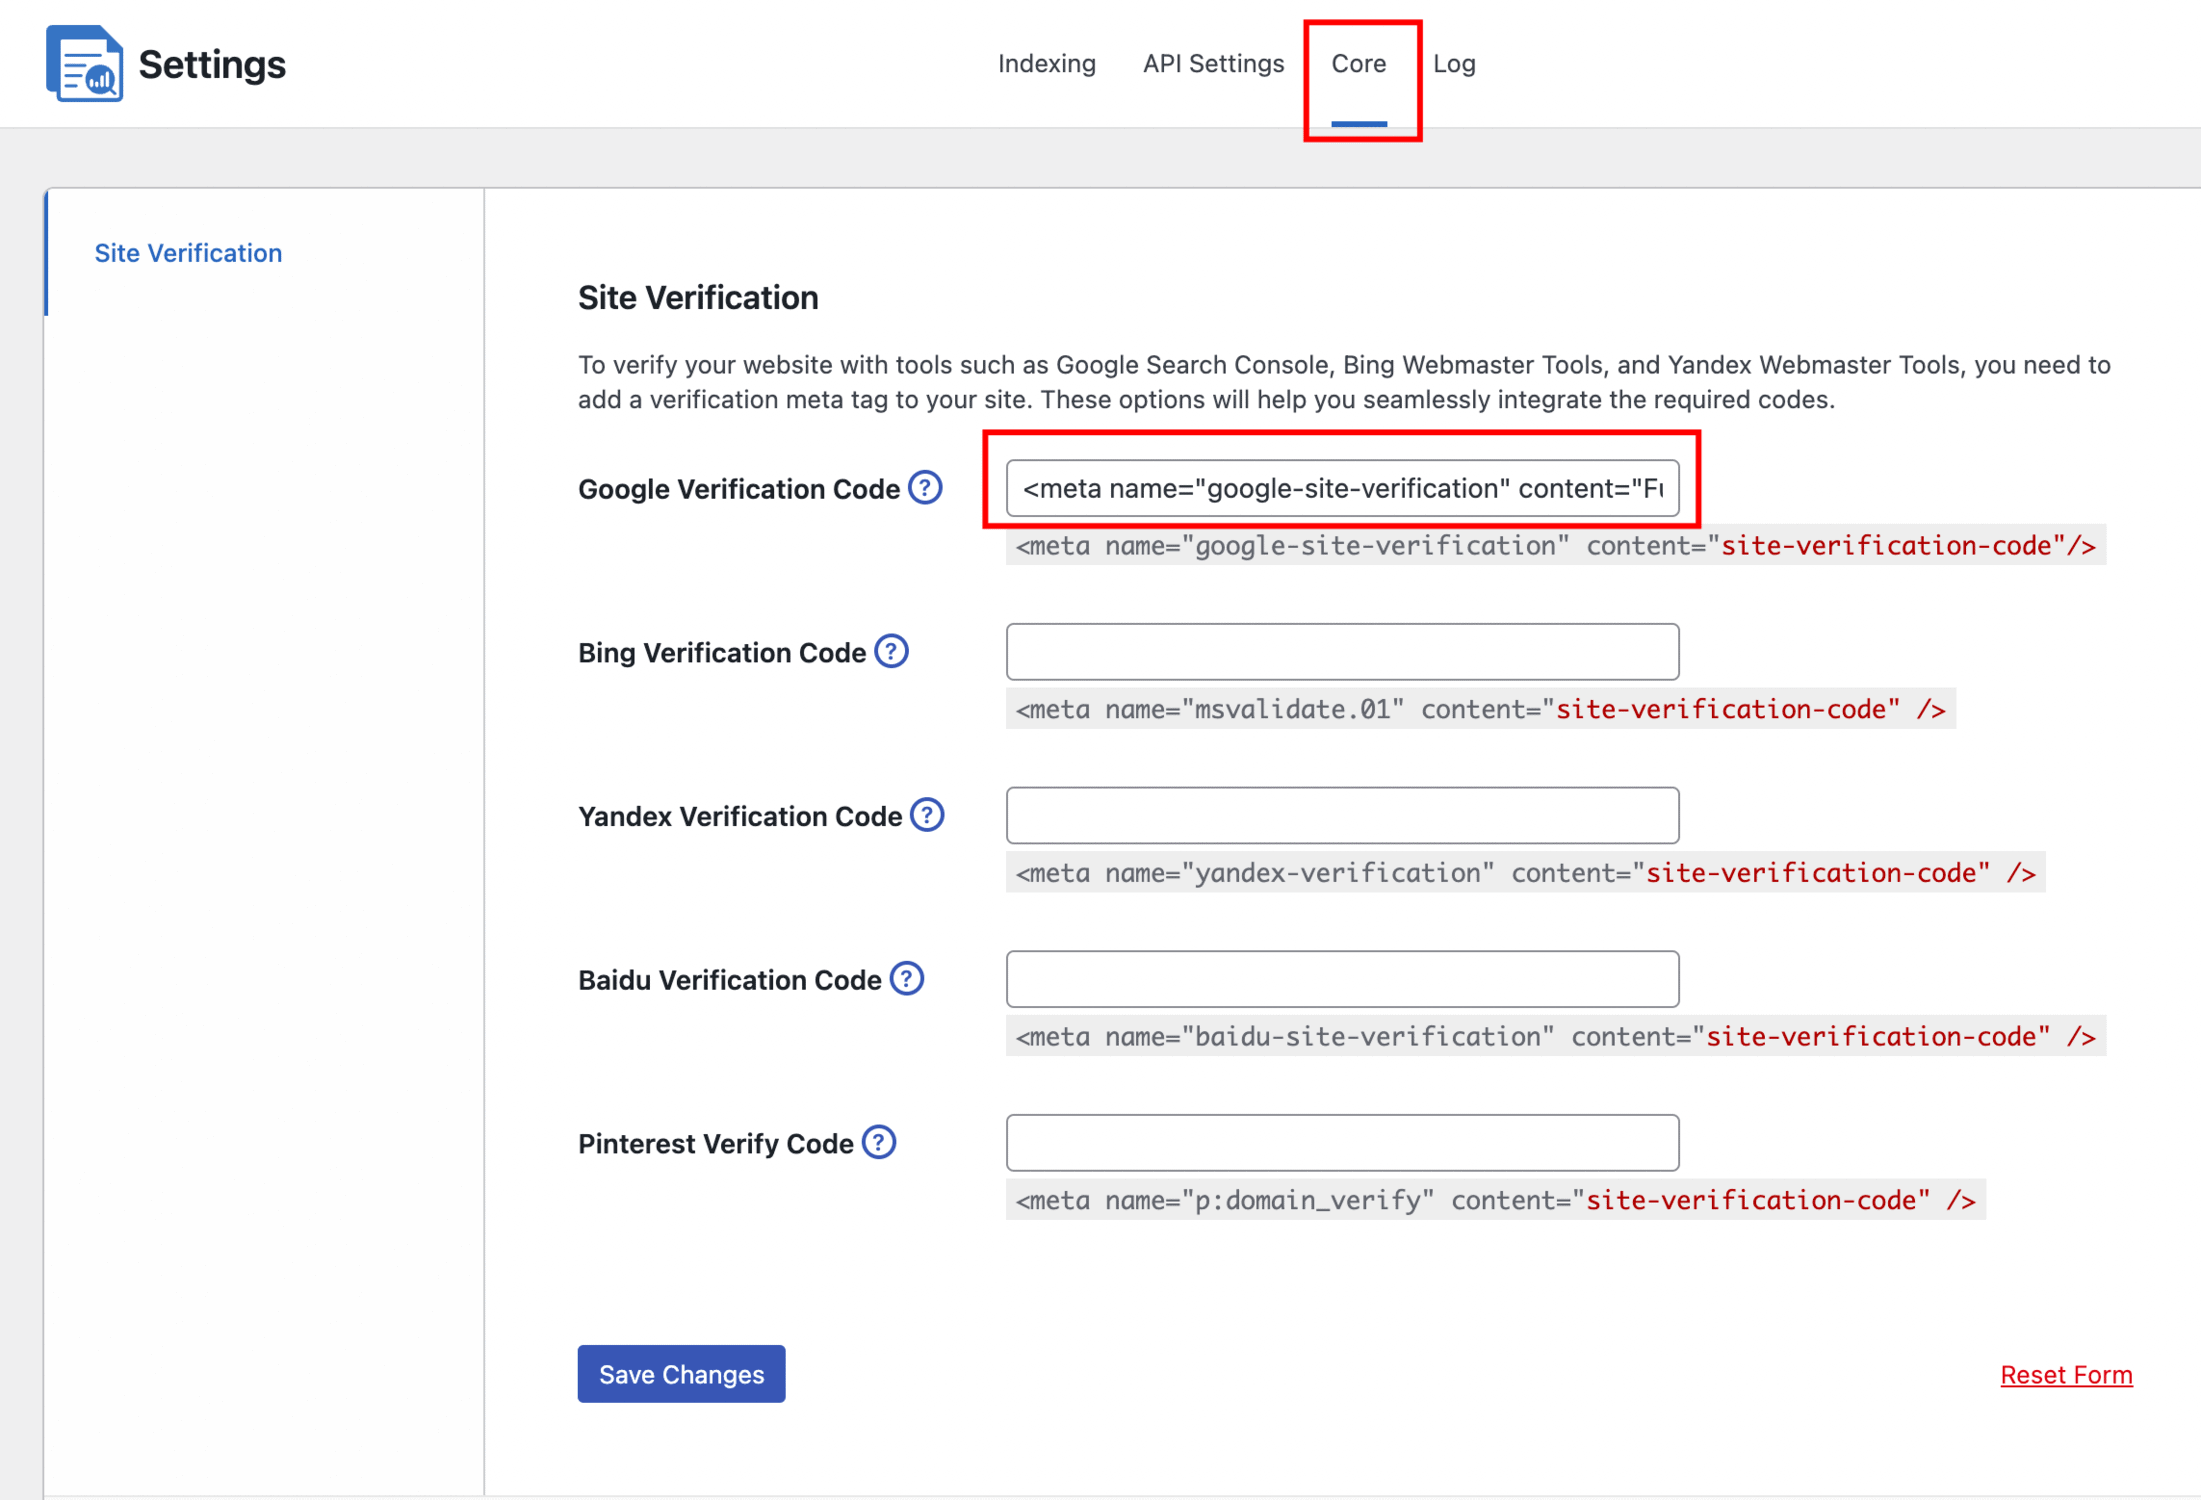
Once you’ve saved the verification code in WordPress, return to Google Search Console and click the Verify button.
If everything was configured correctly, Google will display a confirmation message indicating that your website ownership has been successfully verified.
Step 3: Submit XML Sitemap to Google Search Console
To submit your website sitemap to Google, open Google Search Console. Then, from the menu on the left side of the dashboard, scroll down to the Indexing section and click Sitemaps.
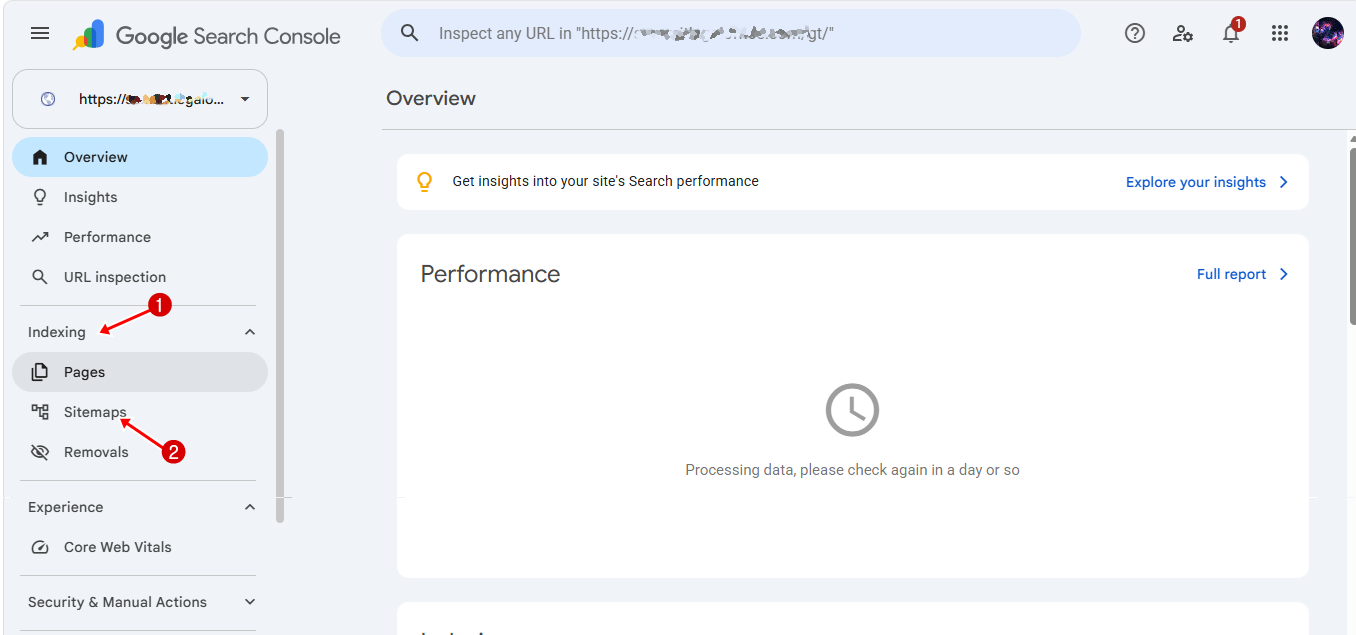
This page allows you to:
- Submit new sitemaps.
- View previously submitted sitemaps.
- Monitor sitemap status.
- Check when Google last read your sitemap.
- Identify any sitemap-related errors.
Under the Add a new sitemap section, you’ll see a field asking you to enter your sitemap URL.
Google automatically displays your domain name, so you only need to enter the sitemap path, not the full URL.
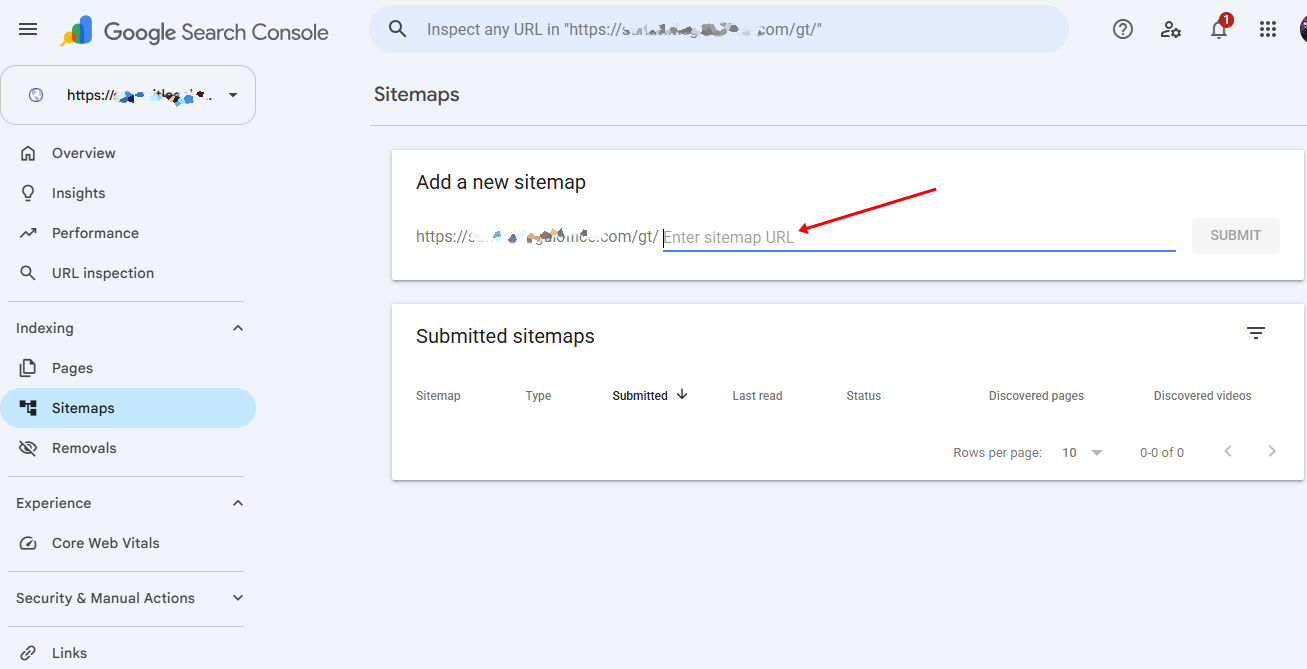
For example, if your sitemap is: https://yourdomain.com/sitemap_index.xml, you only need to enter sitemap_index.xml
After entering your sitemap path, click the Submit button.
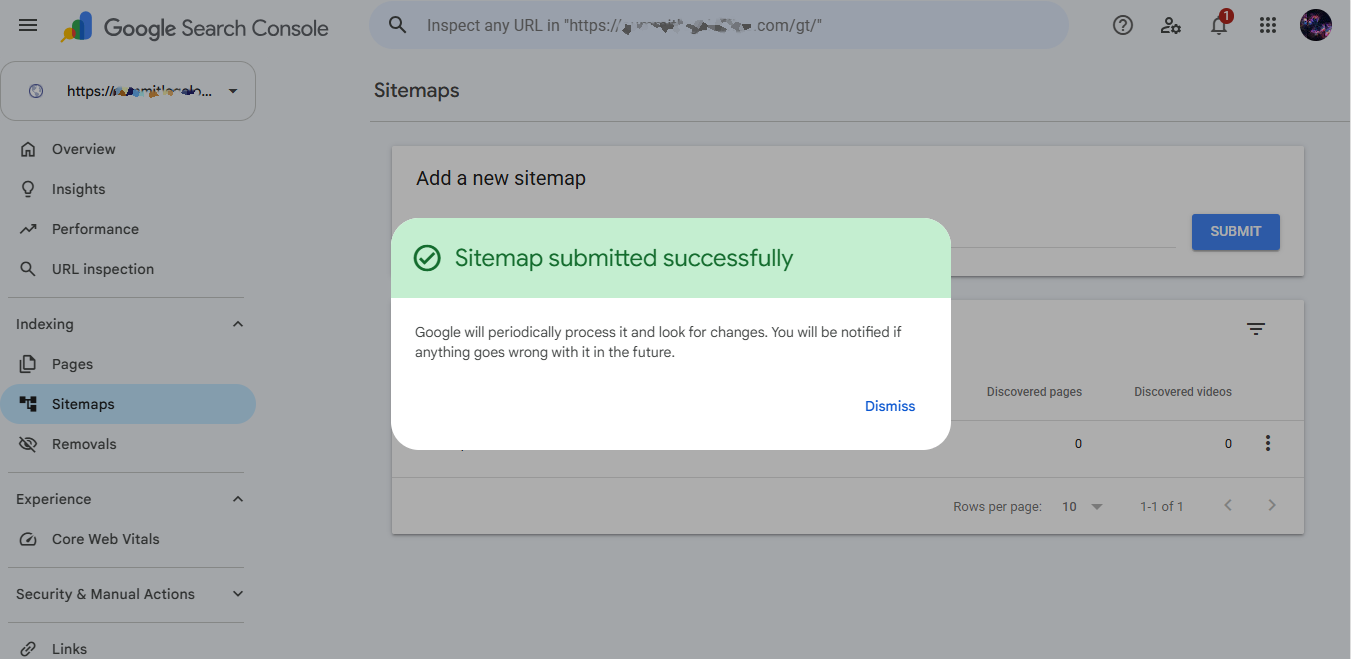
Google Search Console will immediately attempt to access and process your sitemap. If the sitemap is accessible and correctly formatted, it will be added to your account within a few seconds. You should then see the sitemap appear in the Submitted Sitemaps section of the page.
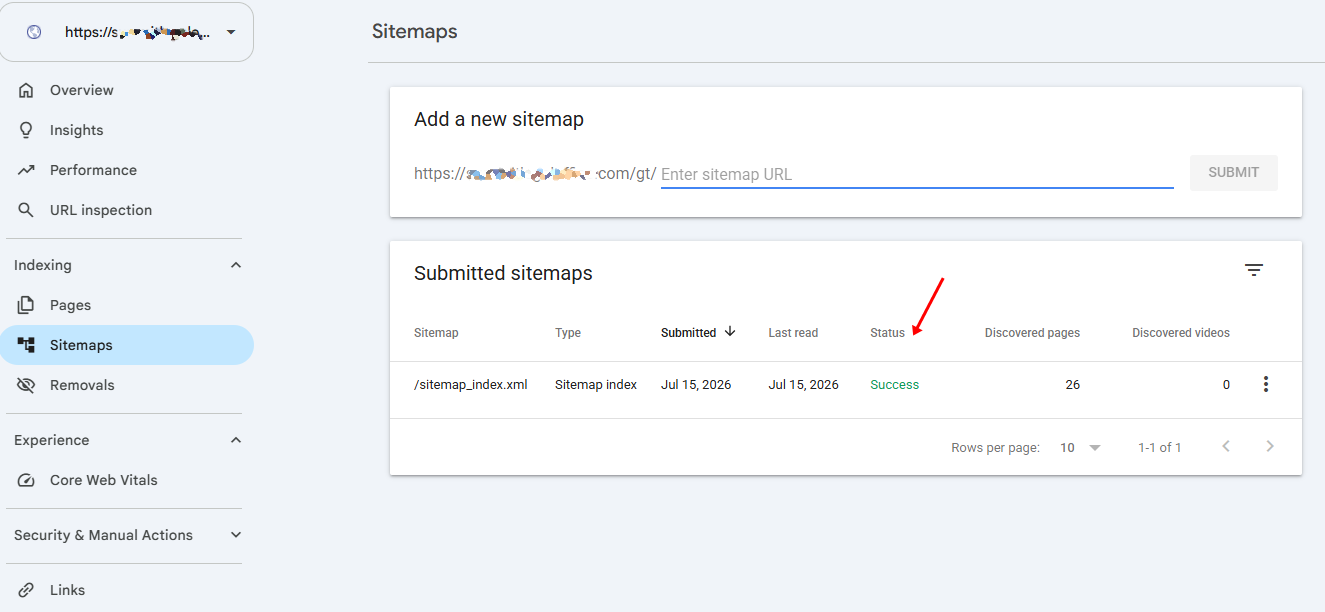
Google Search Console will display a Success message if your sitemap is accepted.
You may see the sitemap status show Couldn’t fetch, Pending, or display “no discovered URLs”. This is normal for newly submitted sitemaps because Google needs time to process the file.
After Google reads your sitemap, the status will update automatically and start showing information about the URLs it discovers from your sitemap.
Note that Google will continue revisiting your sitemap automatically to discover newly published pages, updated posts, products, and other content on your WordPress website. This means you generally won’t need to resubmit your sitemap unless you change its location or switch to a different WordPress SEO plugin.
How to Submit an XML Sitemap to Bing Webmaster Tools
After submitting your XML sitemap to Google Search Console, the next search engine you should add your sitemap to is Bing.
Submitting your sitemap to Bing Webmaster Tools helps Bing discover, crawl, and index your website more efficiently. It also gives you access to useful reports about your site’s search performance on Bing, indexing status, crawl issues, and SEO health.
Let’s walk through each step.
Step 1: Create a Bing Webmaster Tools Account
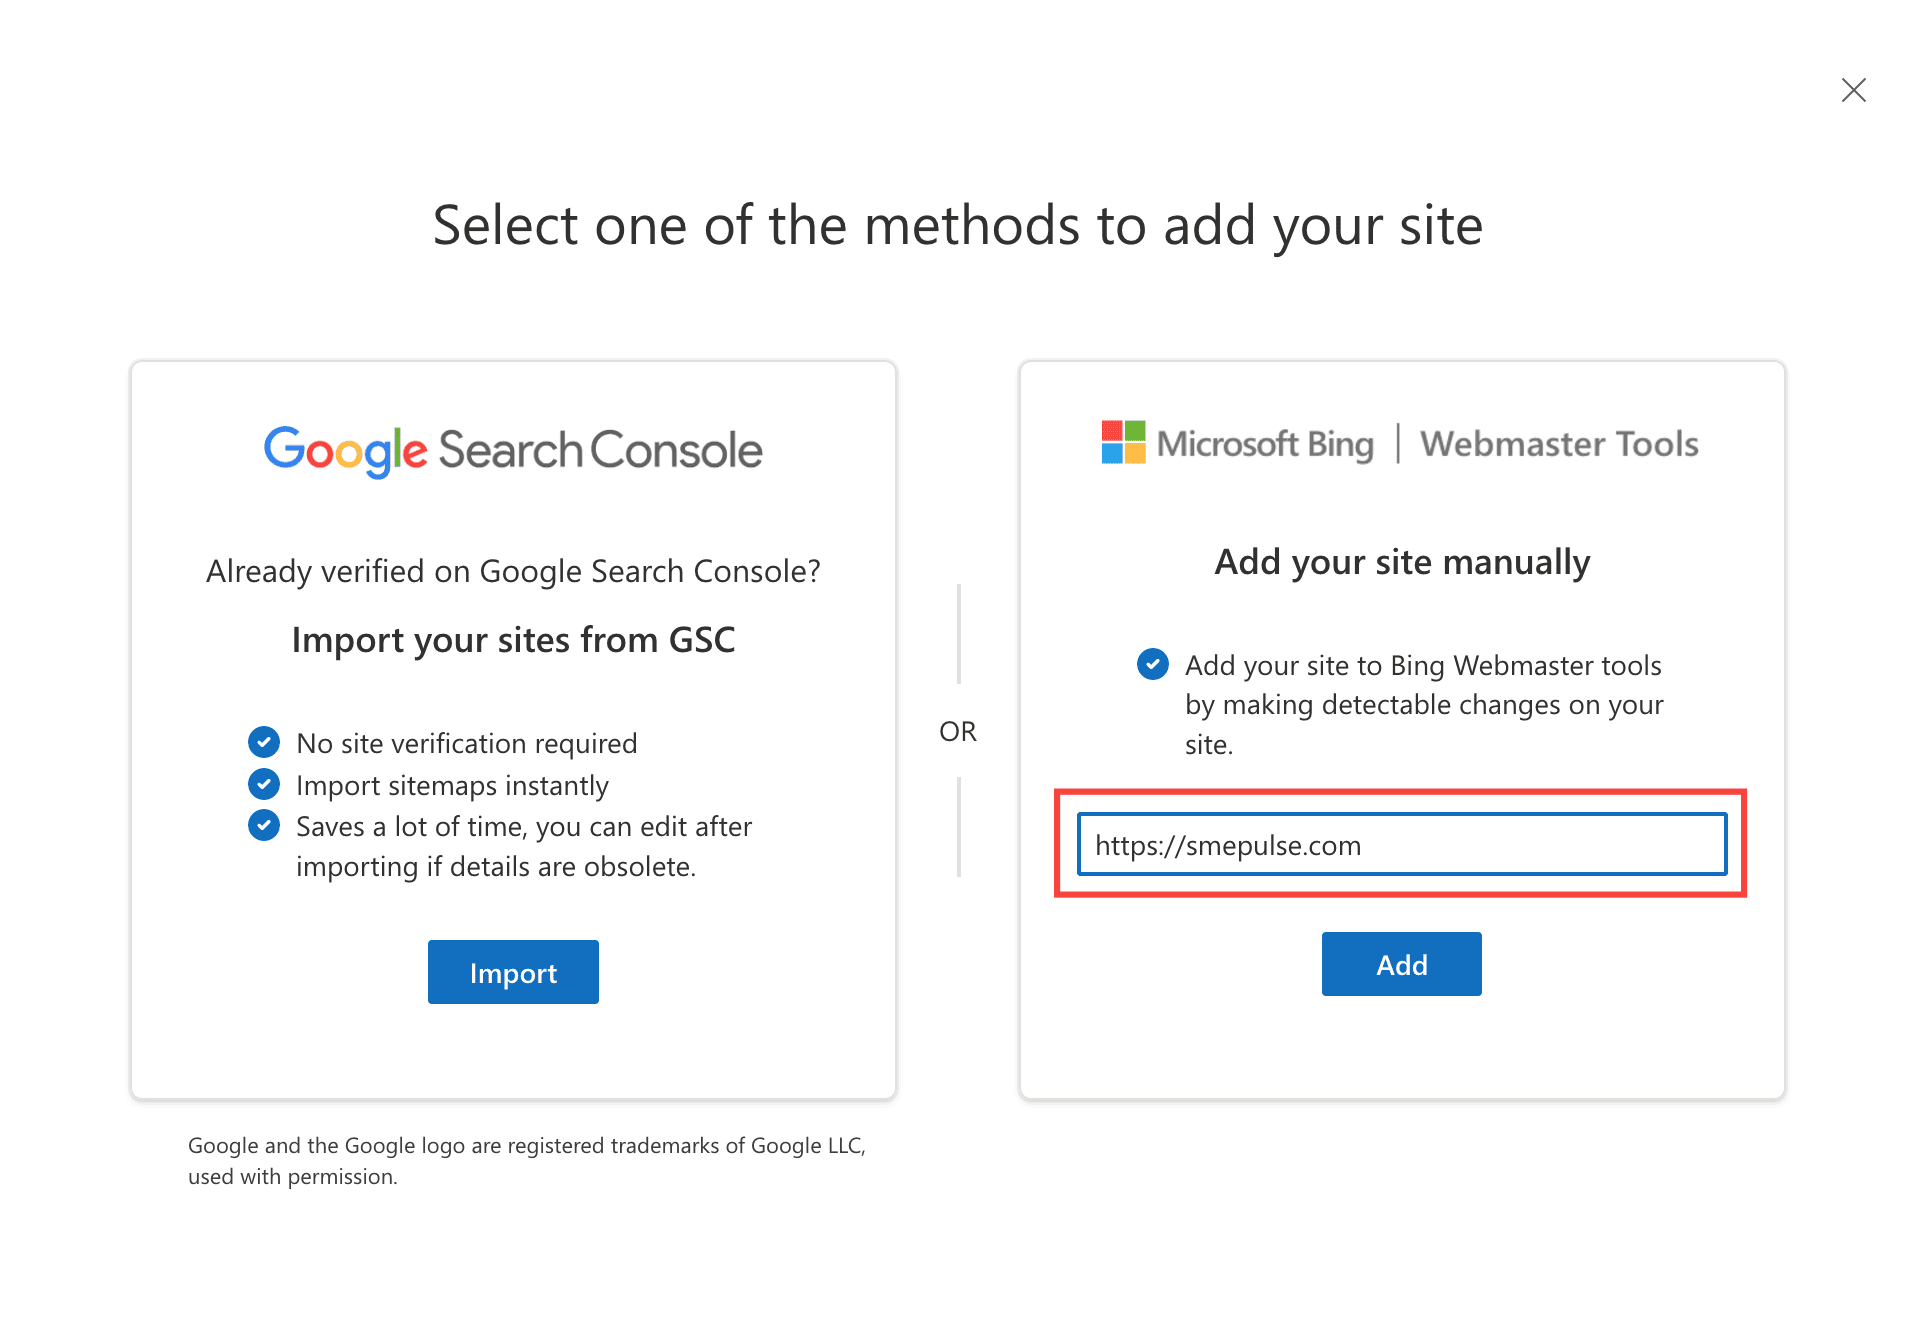
If you don’t already have a Bing Webmaster Tools account, visit the Bing Webmaster Tools website and sign in. If this is your first time using Bing Webmaster Tools, you’ll be prompted to add your website to Bing Webmaster Tools.
You’ll see two options:
- Import your site from Google Search Console
- Add your site manually
Choose the manual option, enter your website’s full URL (including https://), and click Add.
The next step is to verify ownership of your website. Bing provides several verification methods you can use:
- HTML Meta Tag: Add a unique meta tag to the <head> section of your website’s homepage.
- HTML File Upload: Upload a verification file provided by Bing to your website’s root directory.
- DNS Record: Add a TXT record to your domain’s DNS settings.
For this guide, we will use the HTML Meta Tag method. Select HTML Meta Tag verification, and Bing will generate a unique verification tag for your website.
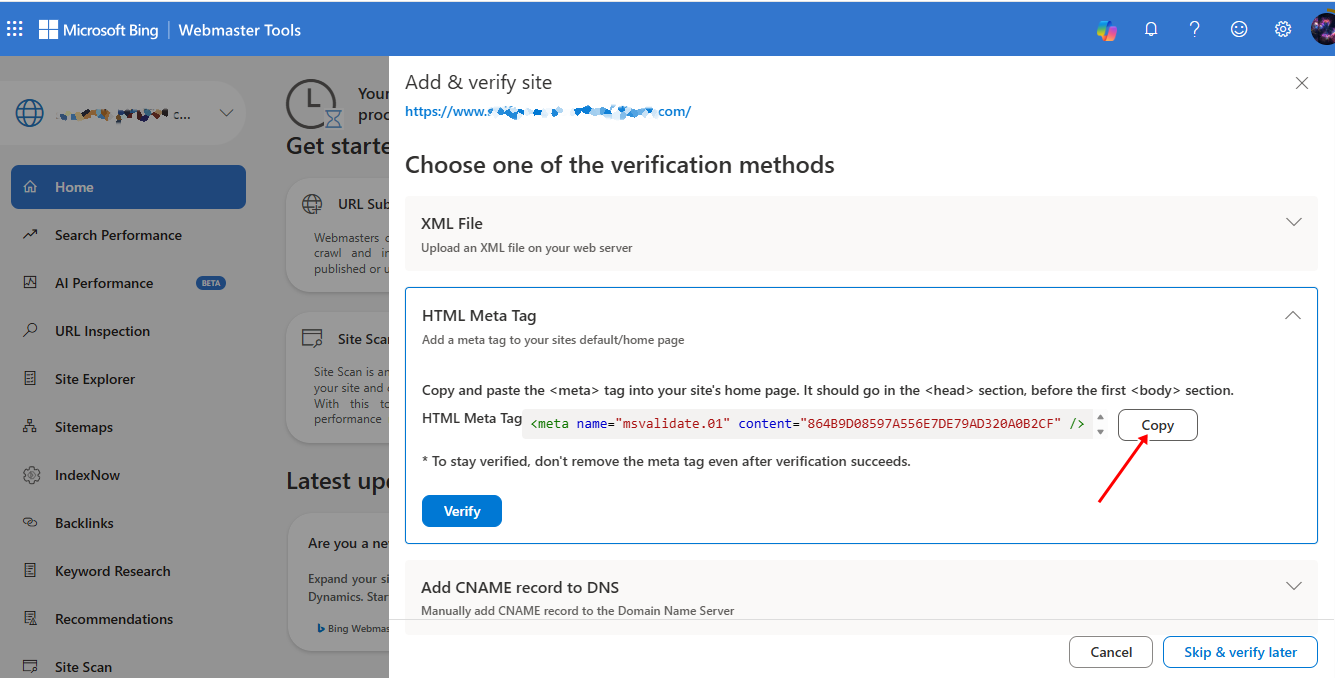
Copy the entire meta tag provided by Bing.
Step 2: Add the Bing Verification Meta Tag to WordPress
Next, log in to your WordPress dashboard and go to Settings > CrawlWP > Core > Site Verification.
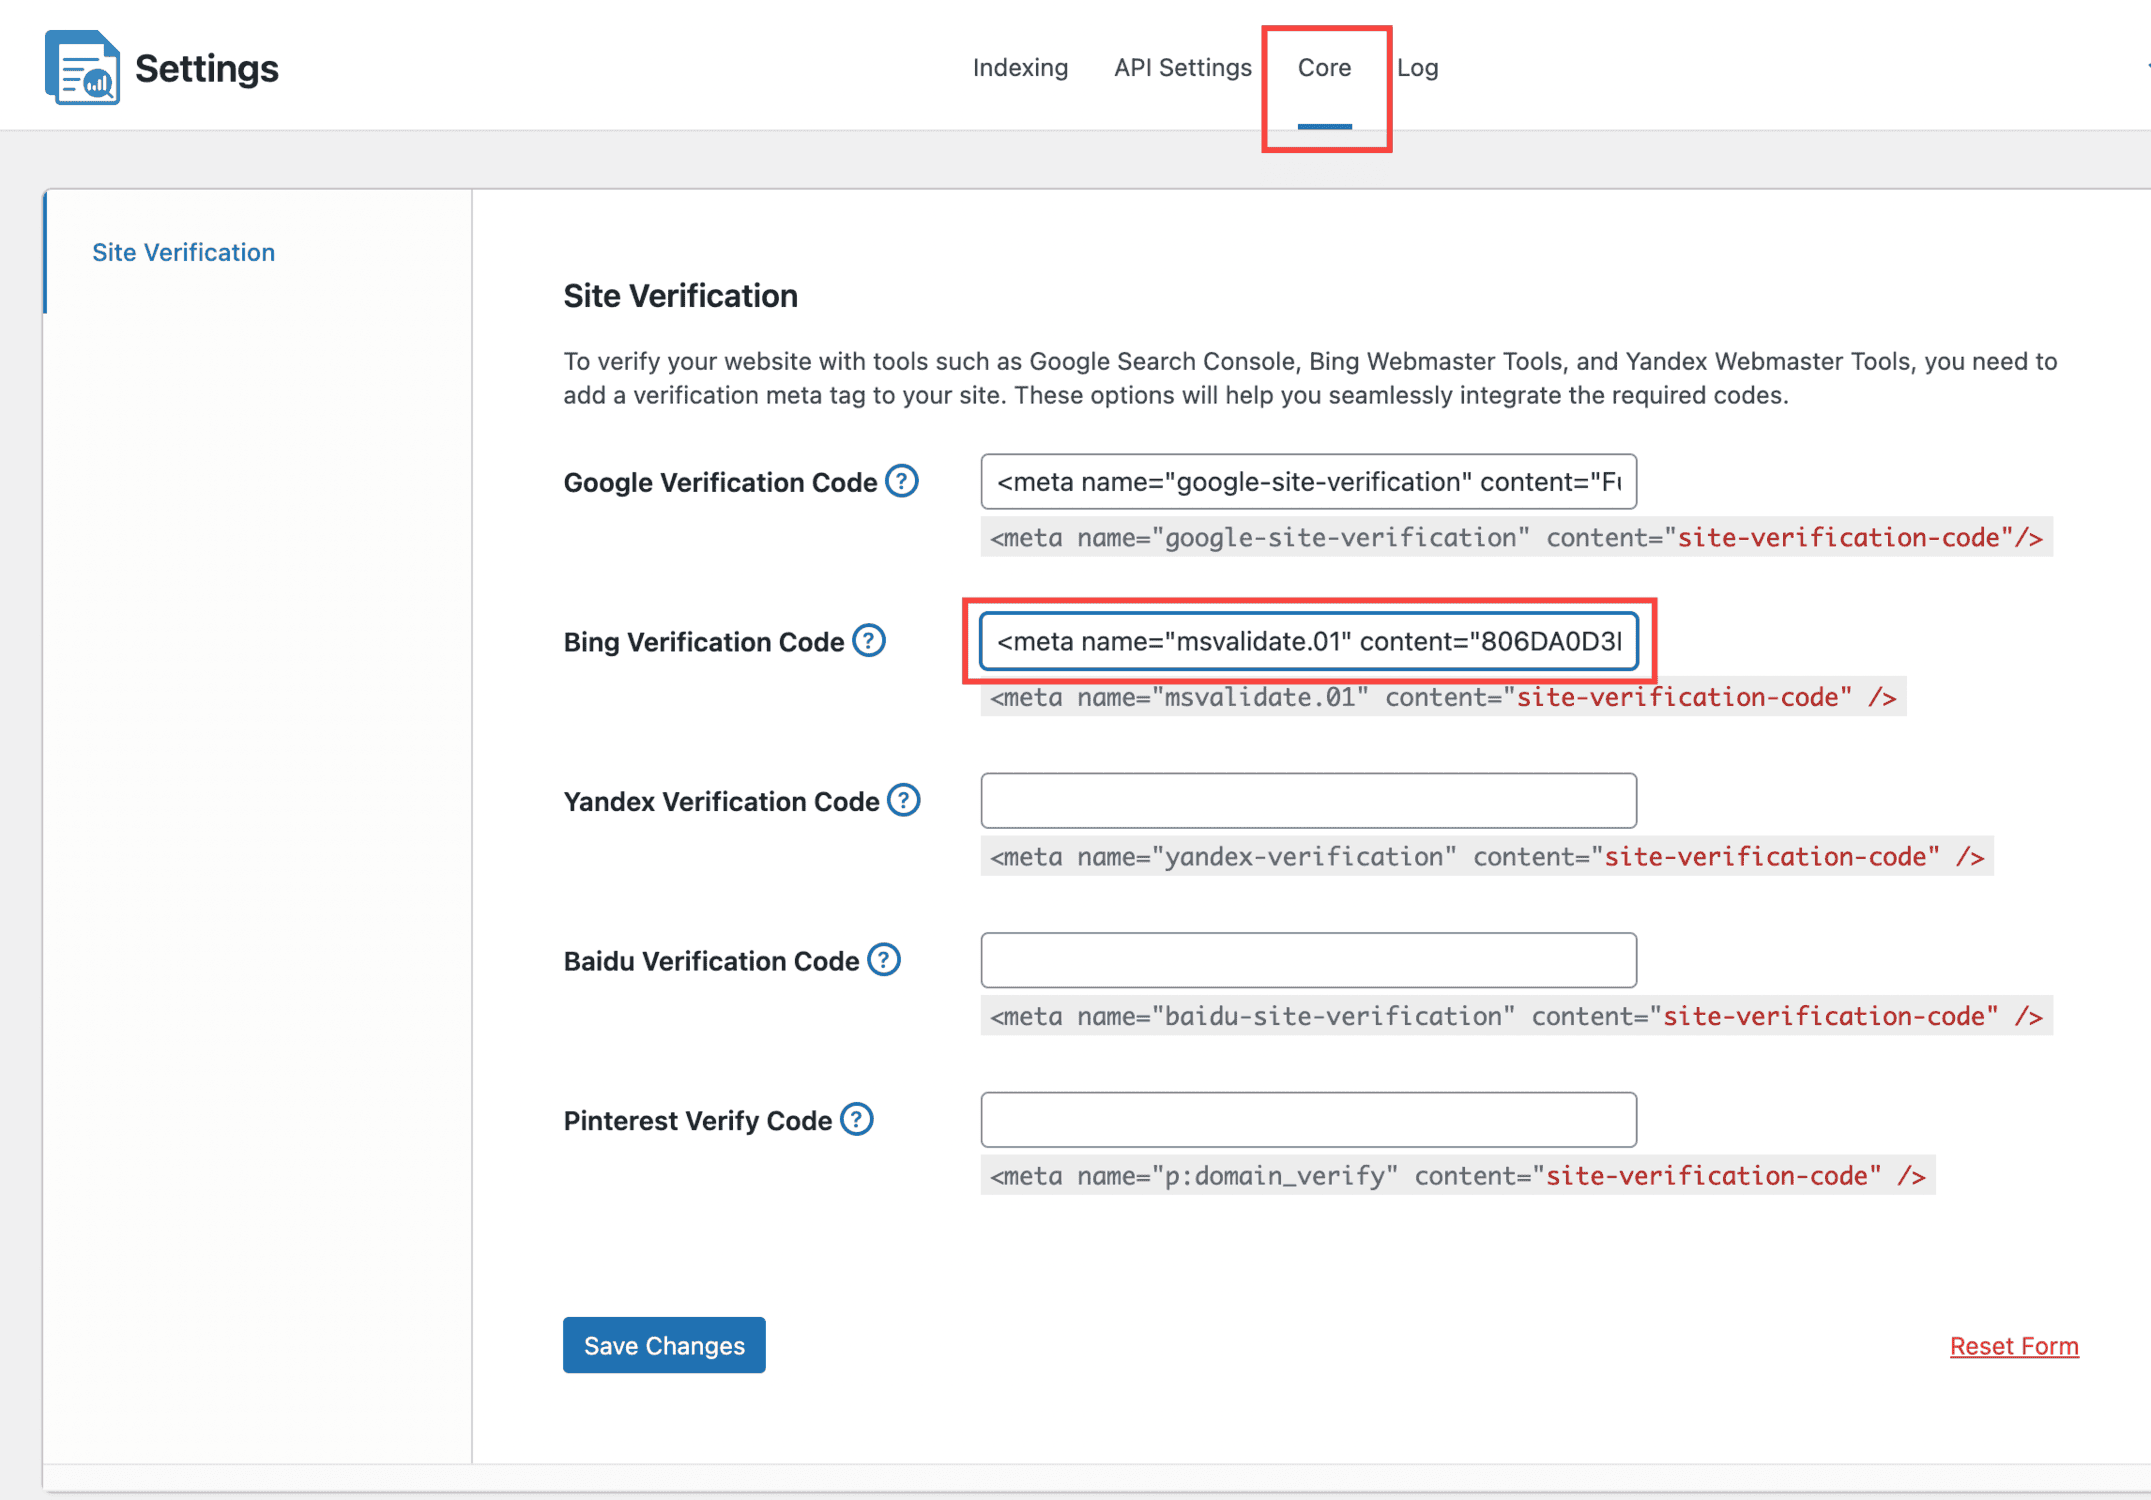
Paste the HTML verification tag you copied from Bing into the Bing Verification Code field, then click Save Changes to apply the settings.
Next, return to Bing Webmaster Tools and click the Verify button. If the tag has been added correctly, Bing will confirm that your website ownership has been successfully verified.
Step 3: Submit XML Sitemap to Bing Webmaster Tools
To submit your website XML sitemap to Bing, open the Bing Webmaster Tools dashboard and navigate to Sitemaps in the left-hand menu.
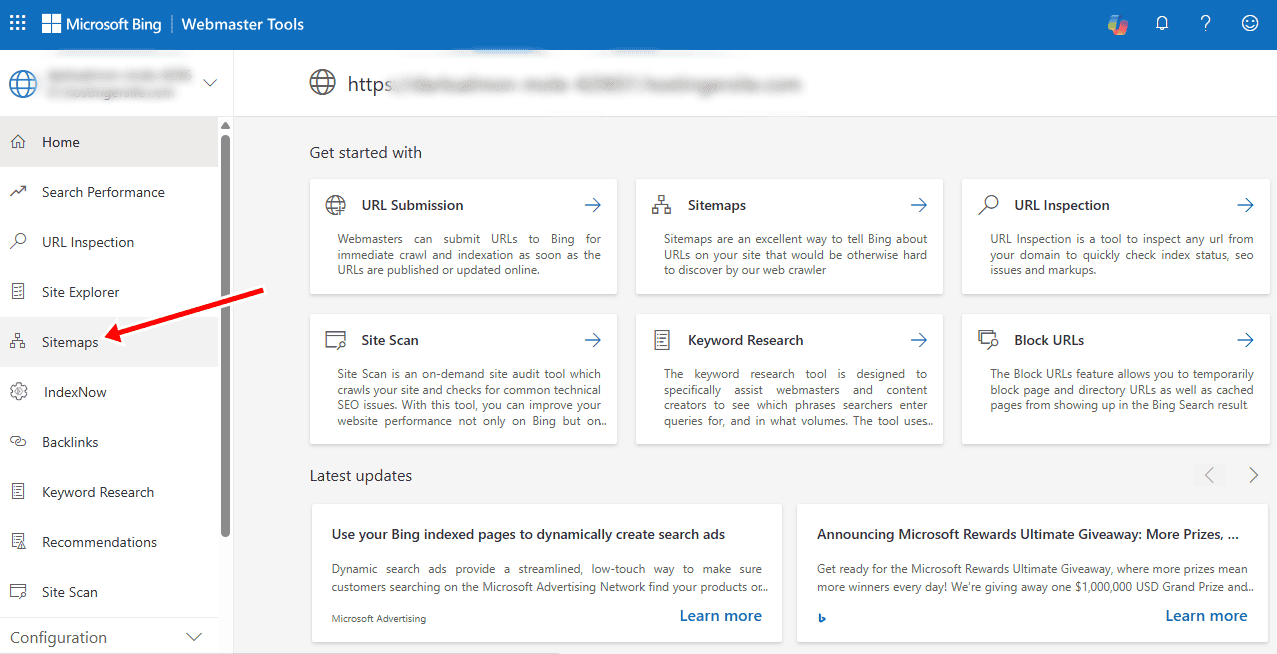
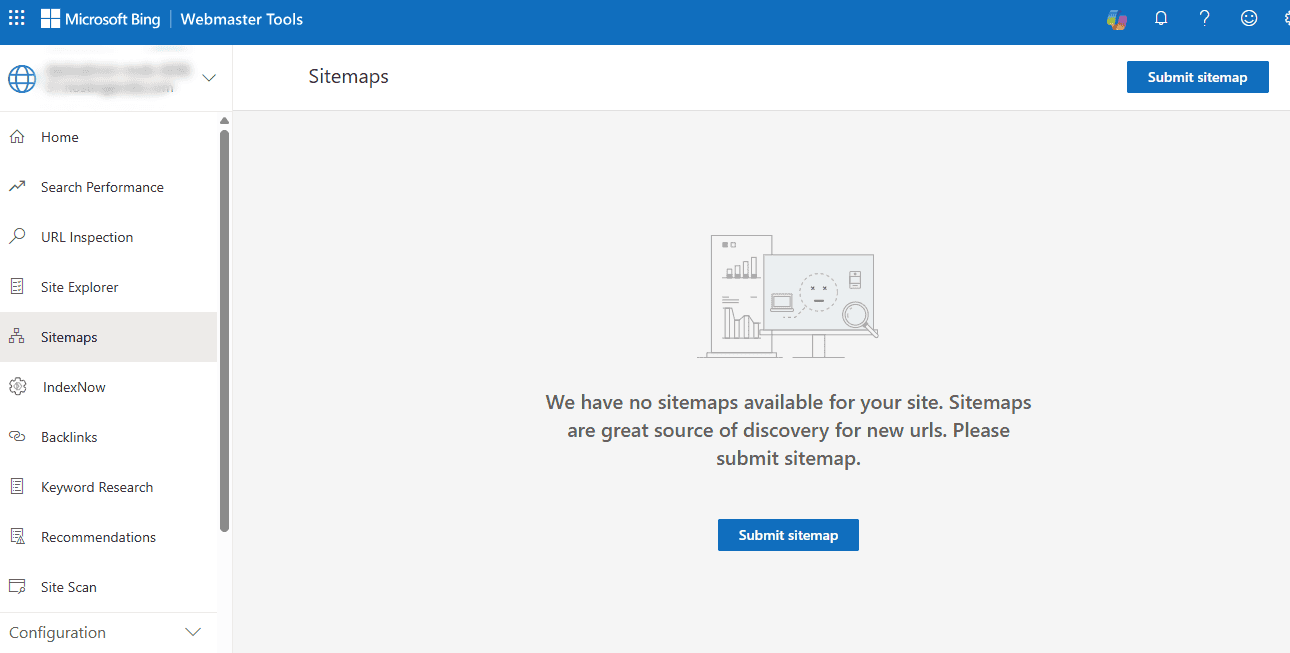
Click the Submit Sitemap button to add your website sitemap to Bing.
Enter your sitemap URL in the provided field (for example: “https://yoursite.com/wp-sitemap.xml”), then click Submit to send your sitemap to Bing.
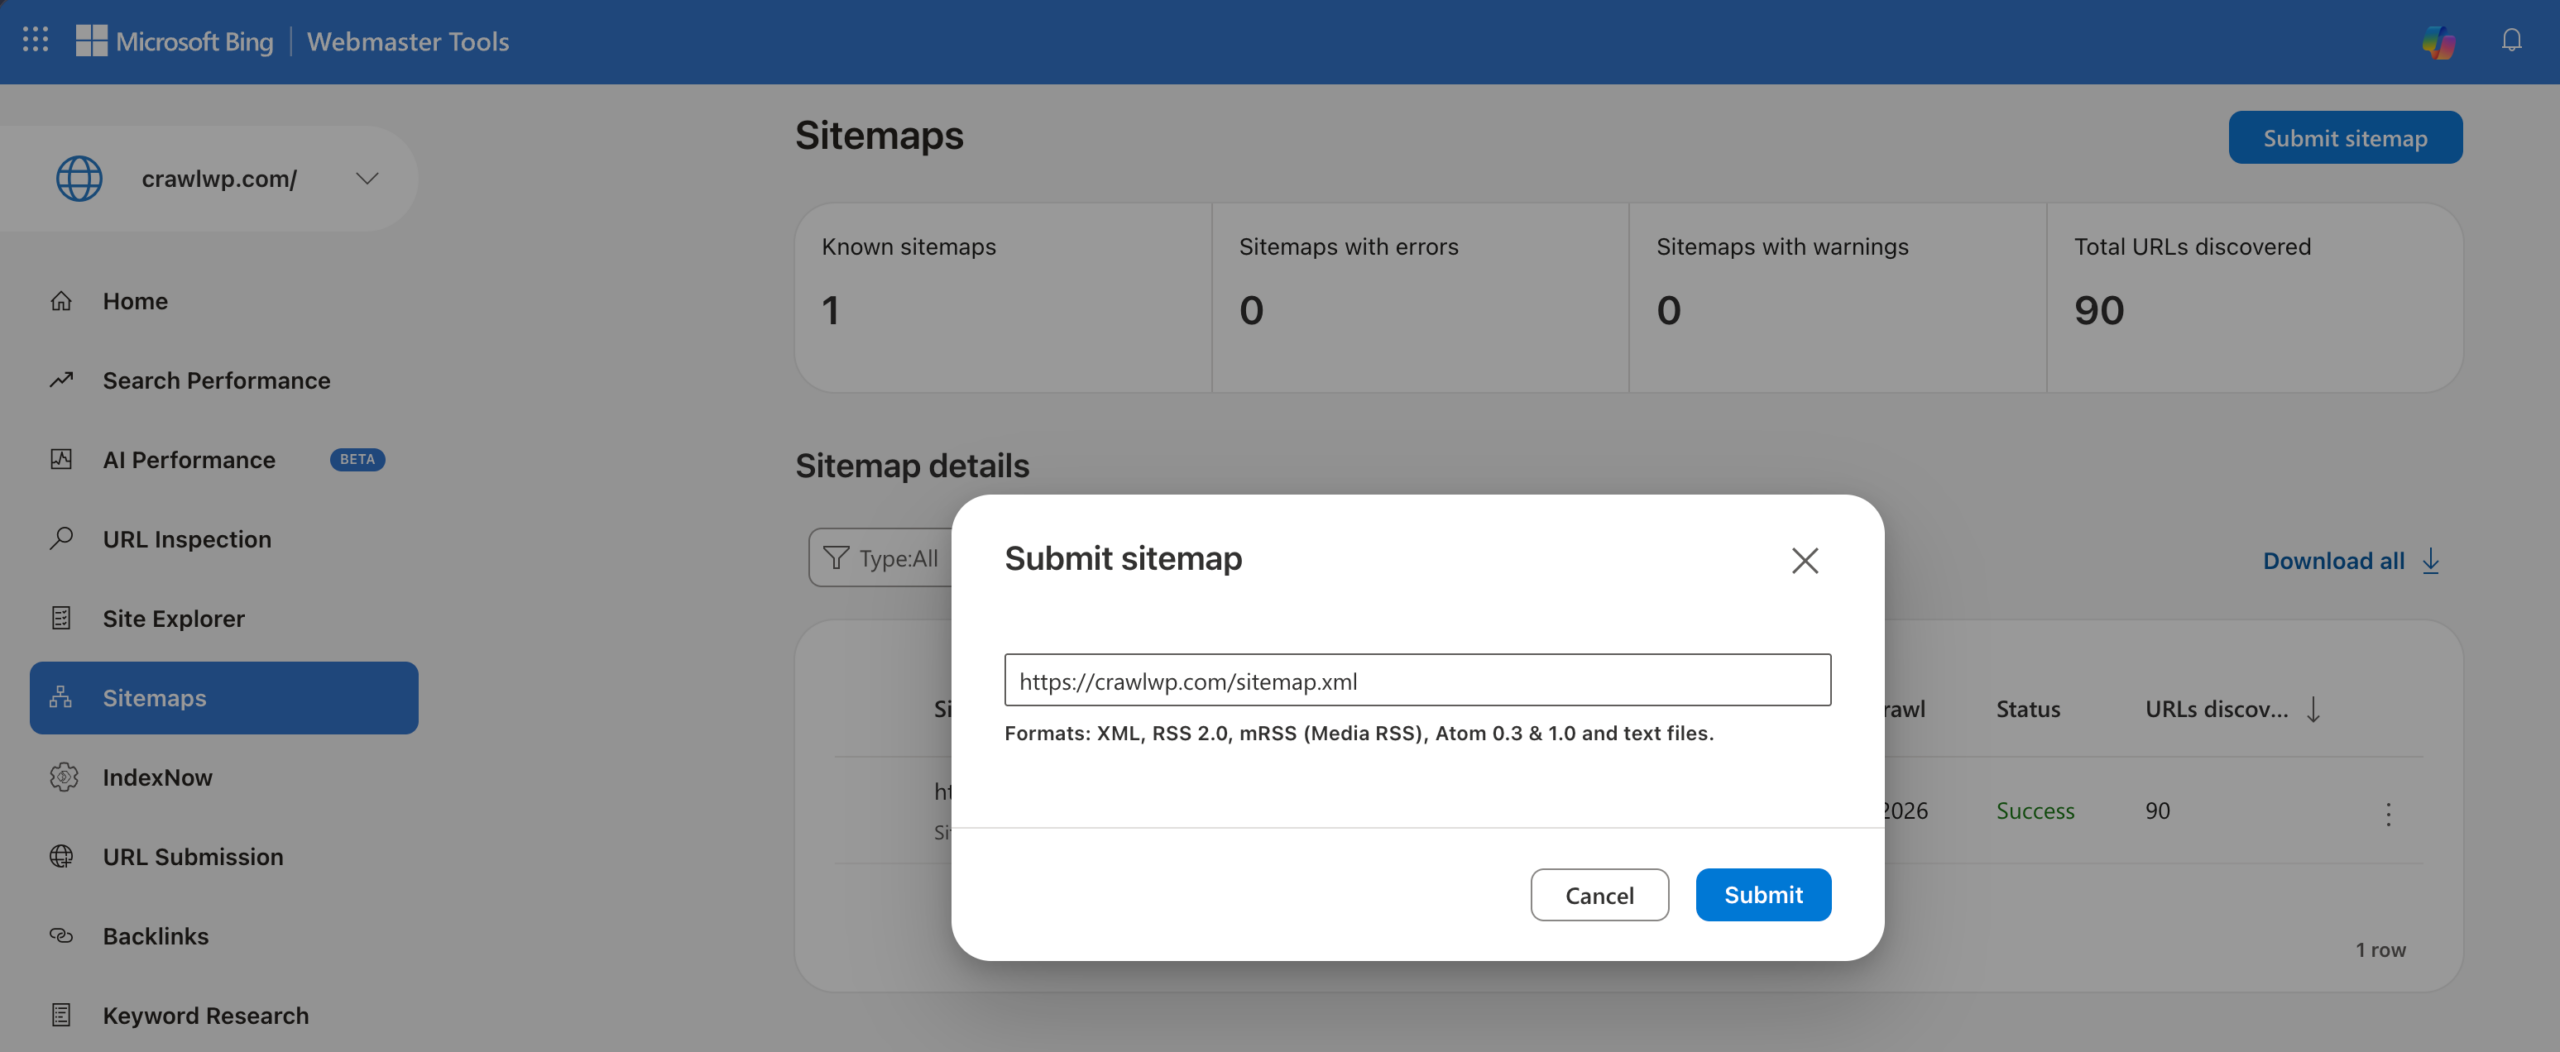
Bing will immediately check whether it can access the sitemap. If everything is configured correctly, the sitemap will be added to your account.
How to Submit an XML Sitemap to Yandex Webmaster
While Google and Bing receive the majority of search traffic worldwide, Yandex is an important search engine for reaching users in regions where it is widely used, particularly in Russia.
Follow the steps below to submit your WordPress sitemap to Yandex Webmaster.
Step 1: Create a Yandex Webmaster Account
To get started, you need a Yandex account. Visit the Yandex Webmaster website and sign in using your existing Yandex account.
If you do not have an account, you can create one by registering with your email address and completing the required information.
After signing in, you will be taken to the Yandex Webmaster dashboard, where you can add and manage your websites.
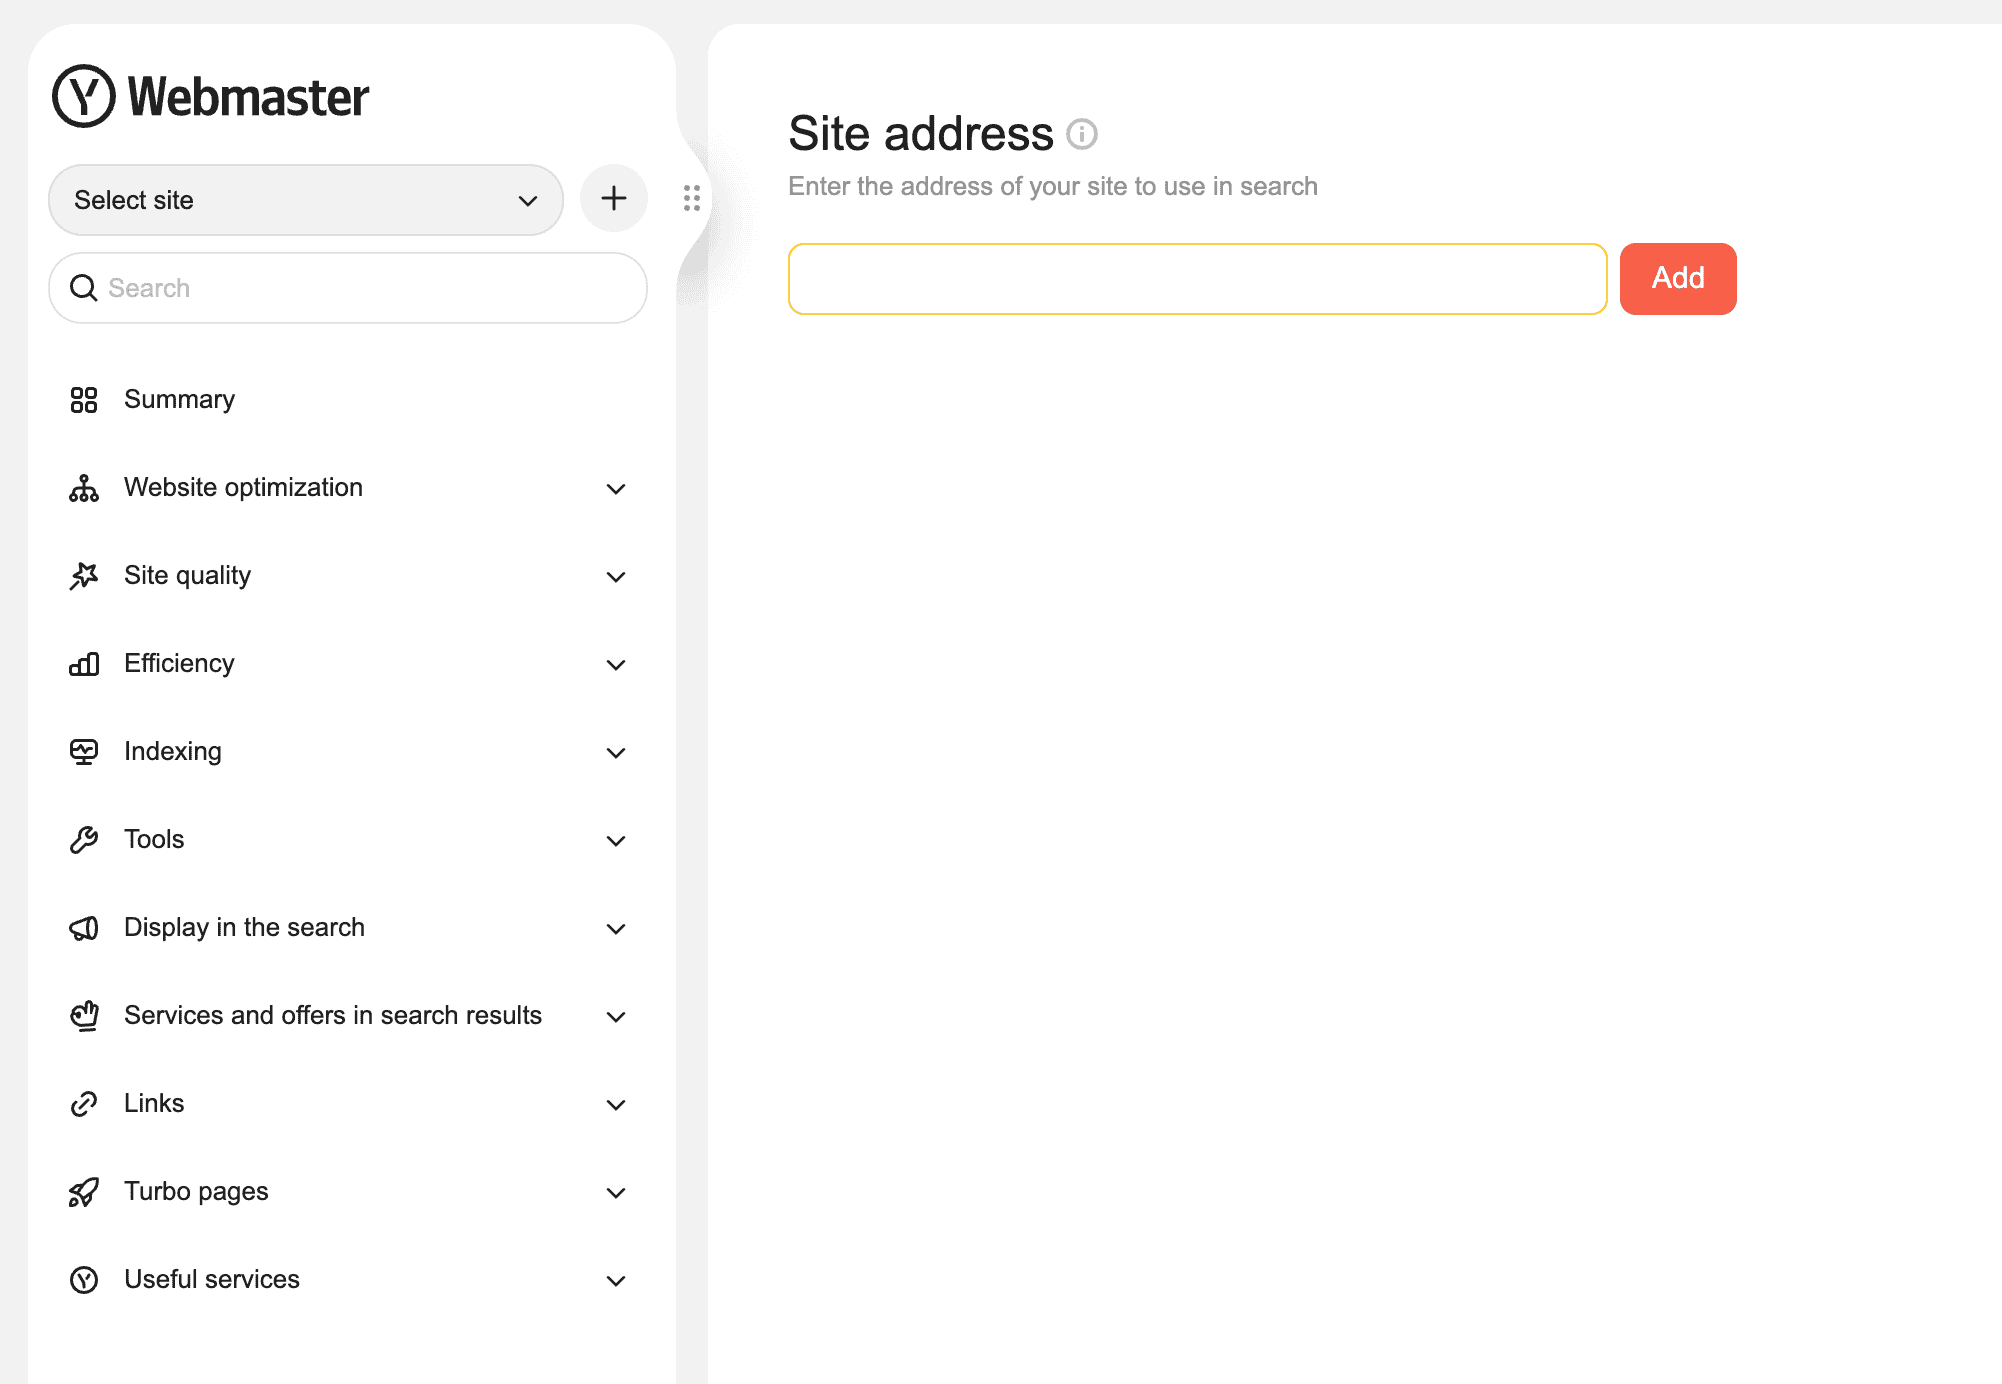
Enter your website address in the provided field. Make sure you enter the complete URL version that matches your WordPress website.
After entering your website address, click Add.
Next, Yandex will ask you to verify that you own the website. Choose the HTML Meta Tag verification method and copy the provided meta tag.
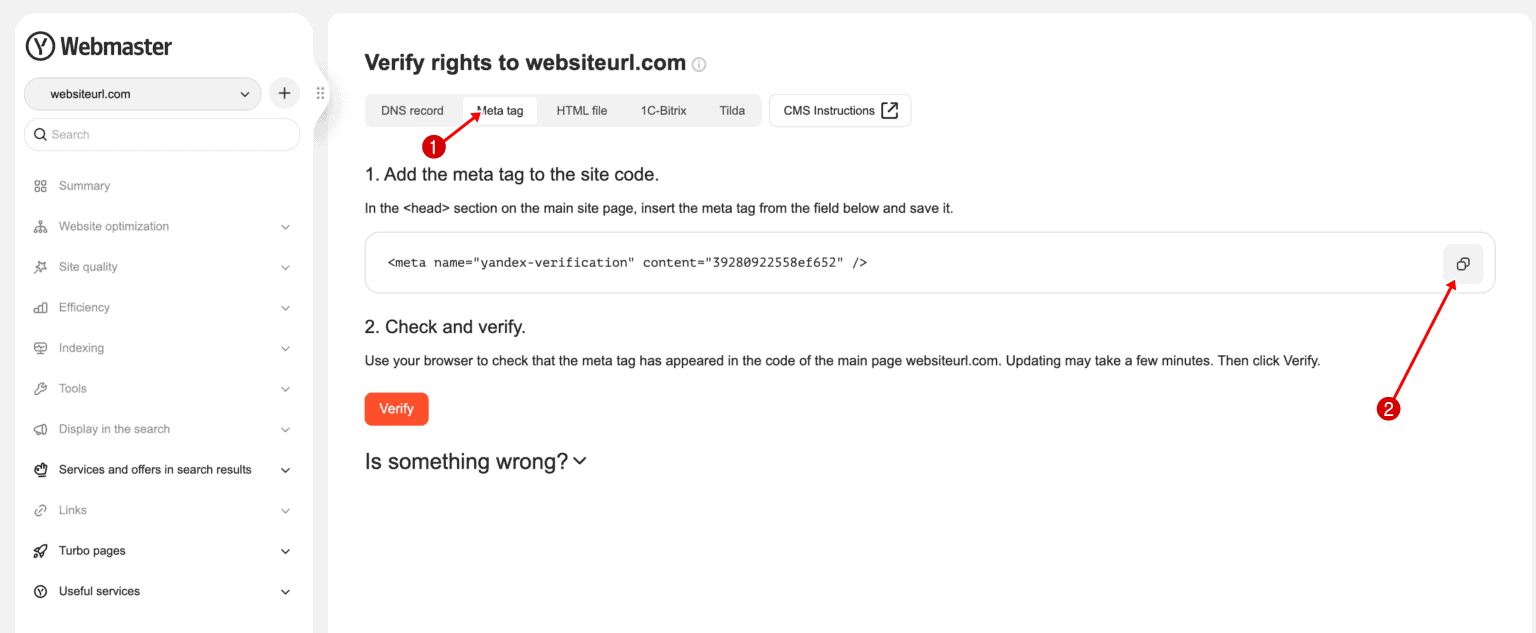
Step 2: Add the Yandex Verification Meta Tag to WordPress
To do this, log in to your WordPress admin dashboard and navigate to CrawlWP >> Settings >> Advanced >> Site Verification.
Then paste the copied HTML tag content into the Yandex Verification Code field and save the changes.
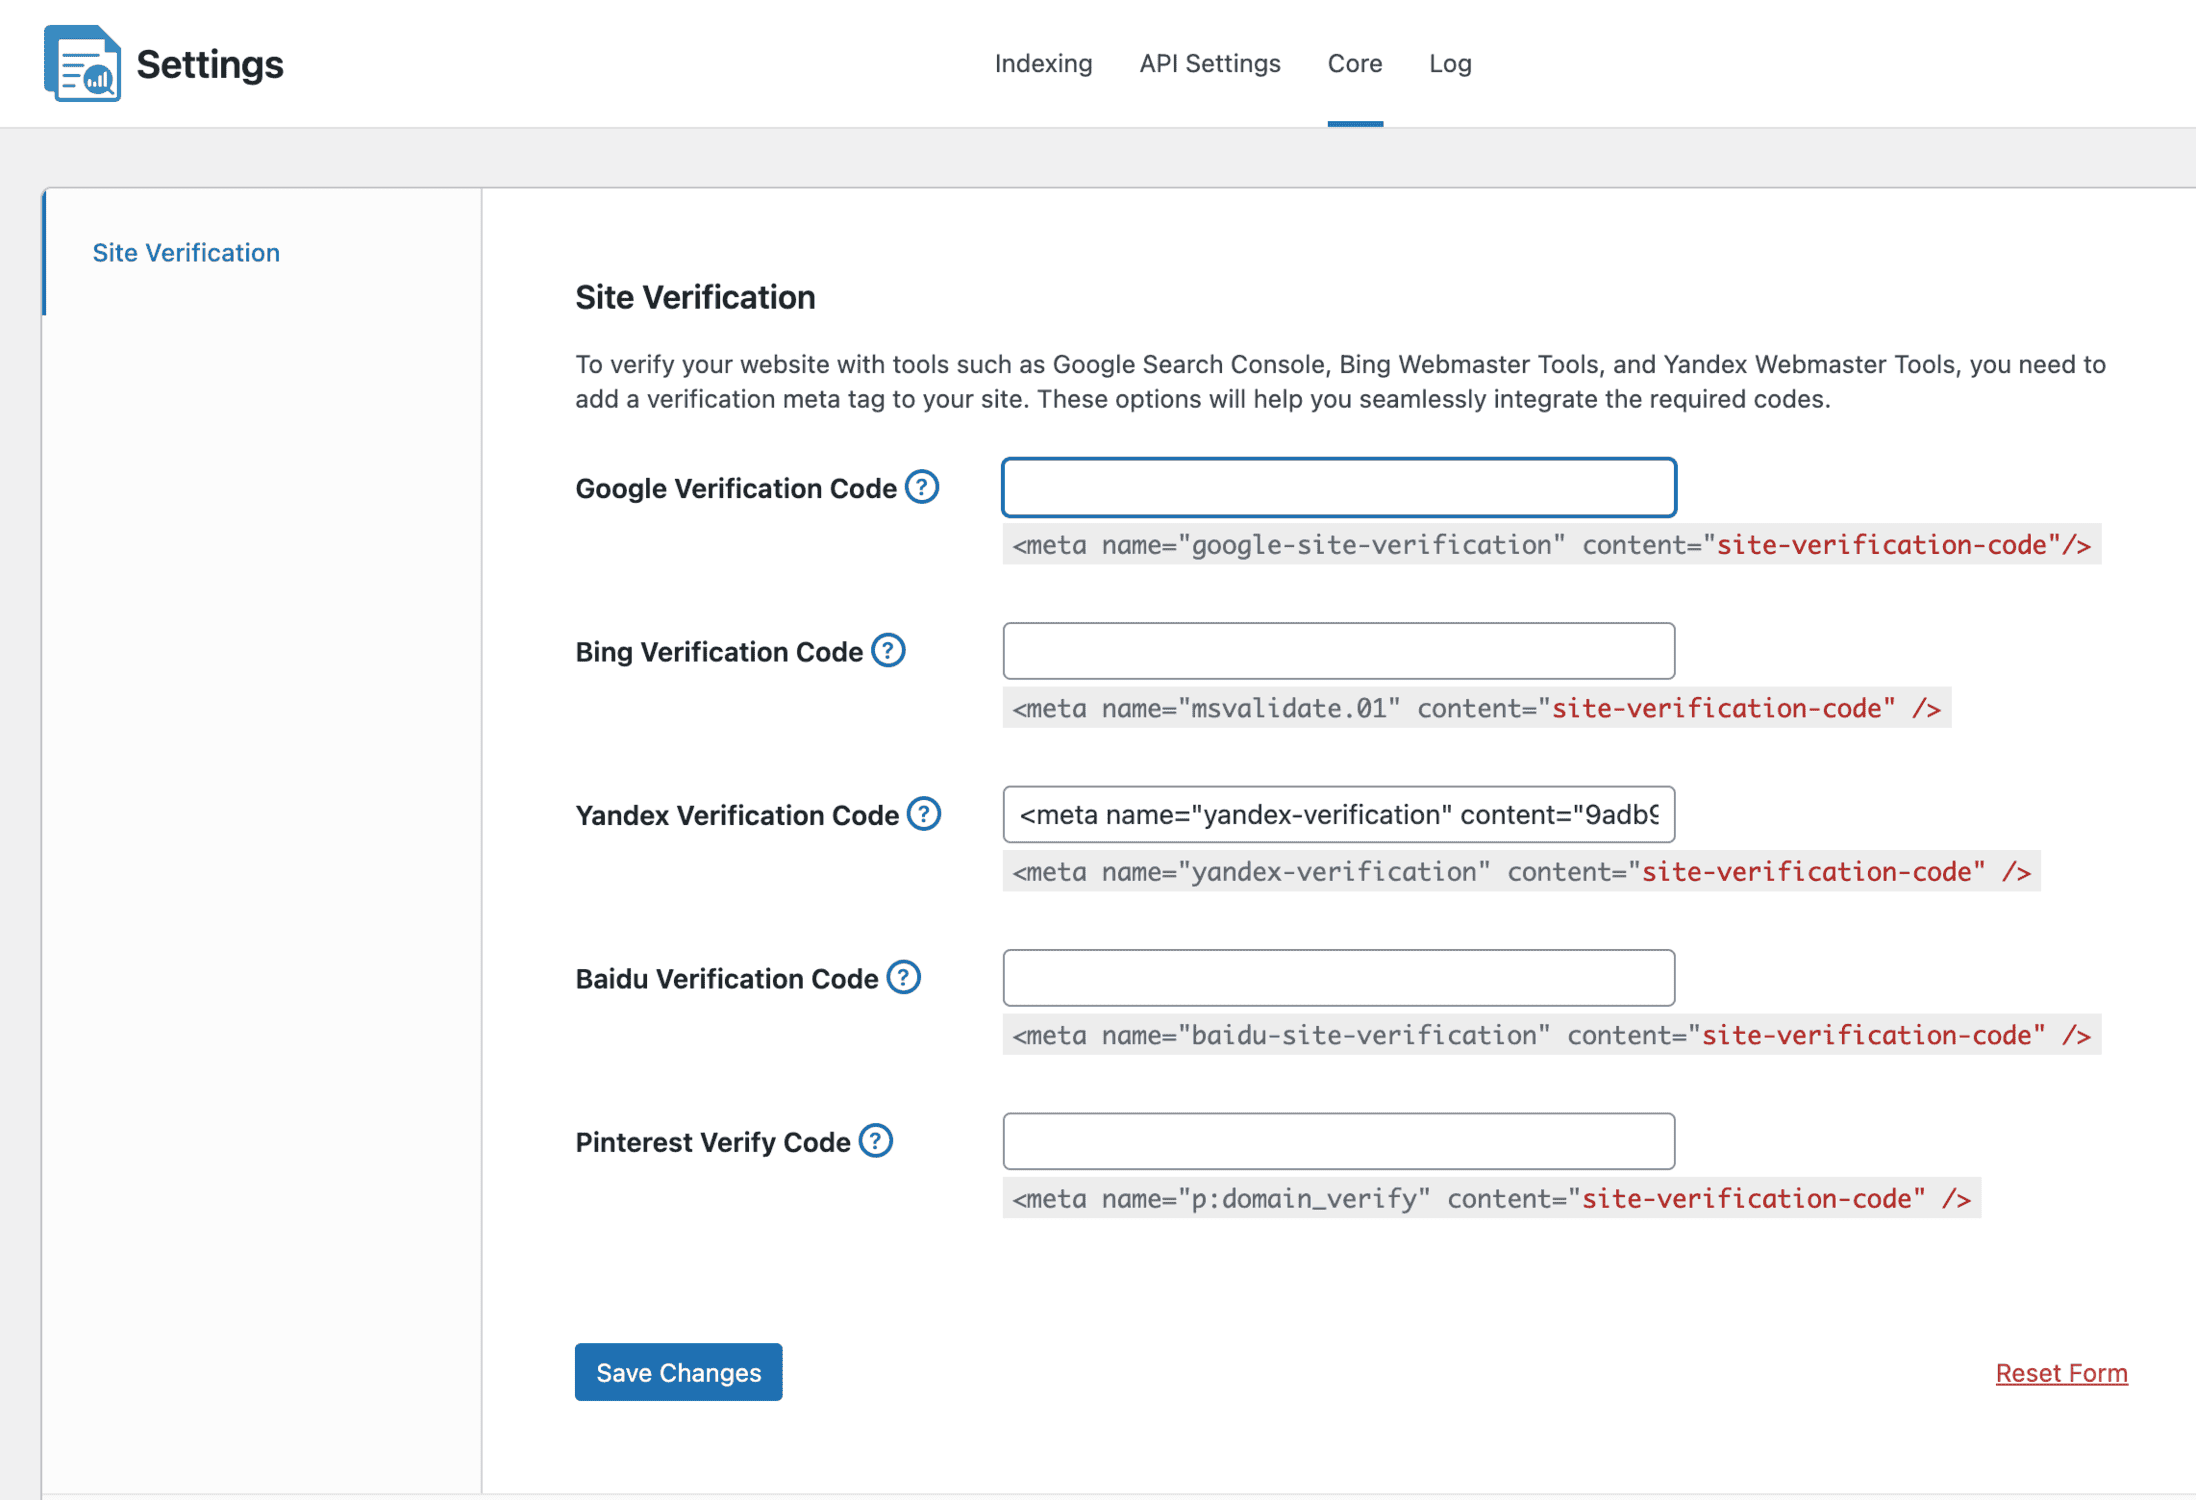
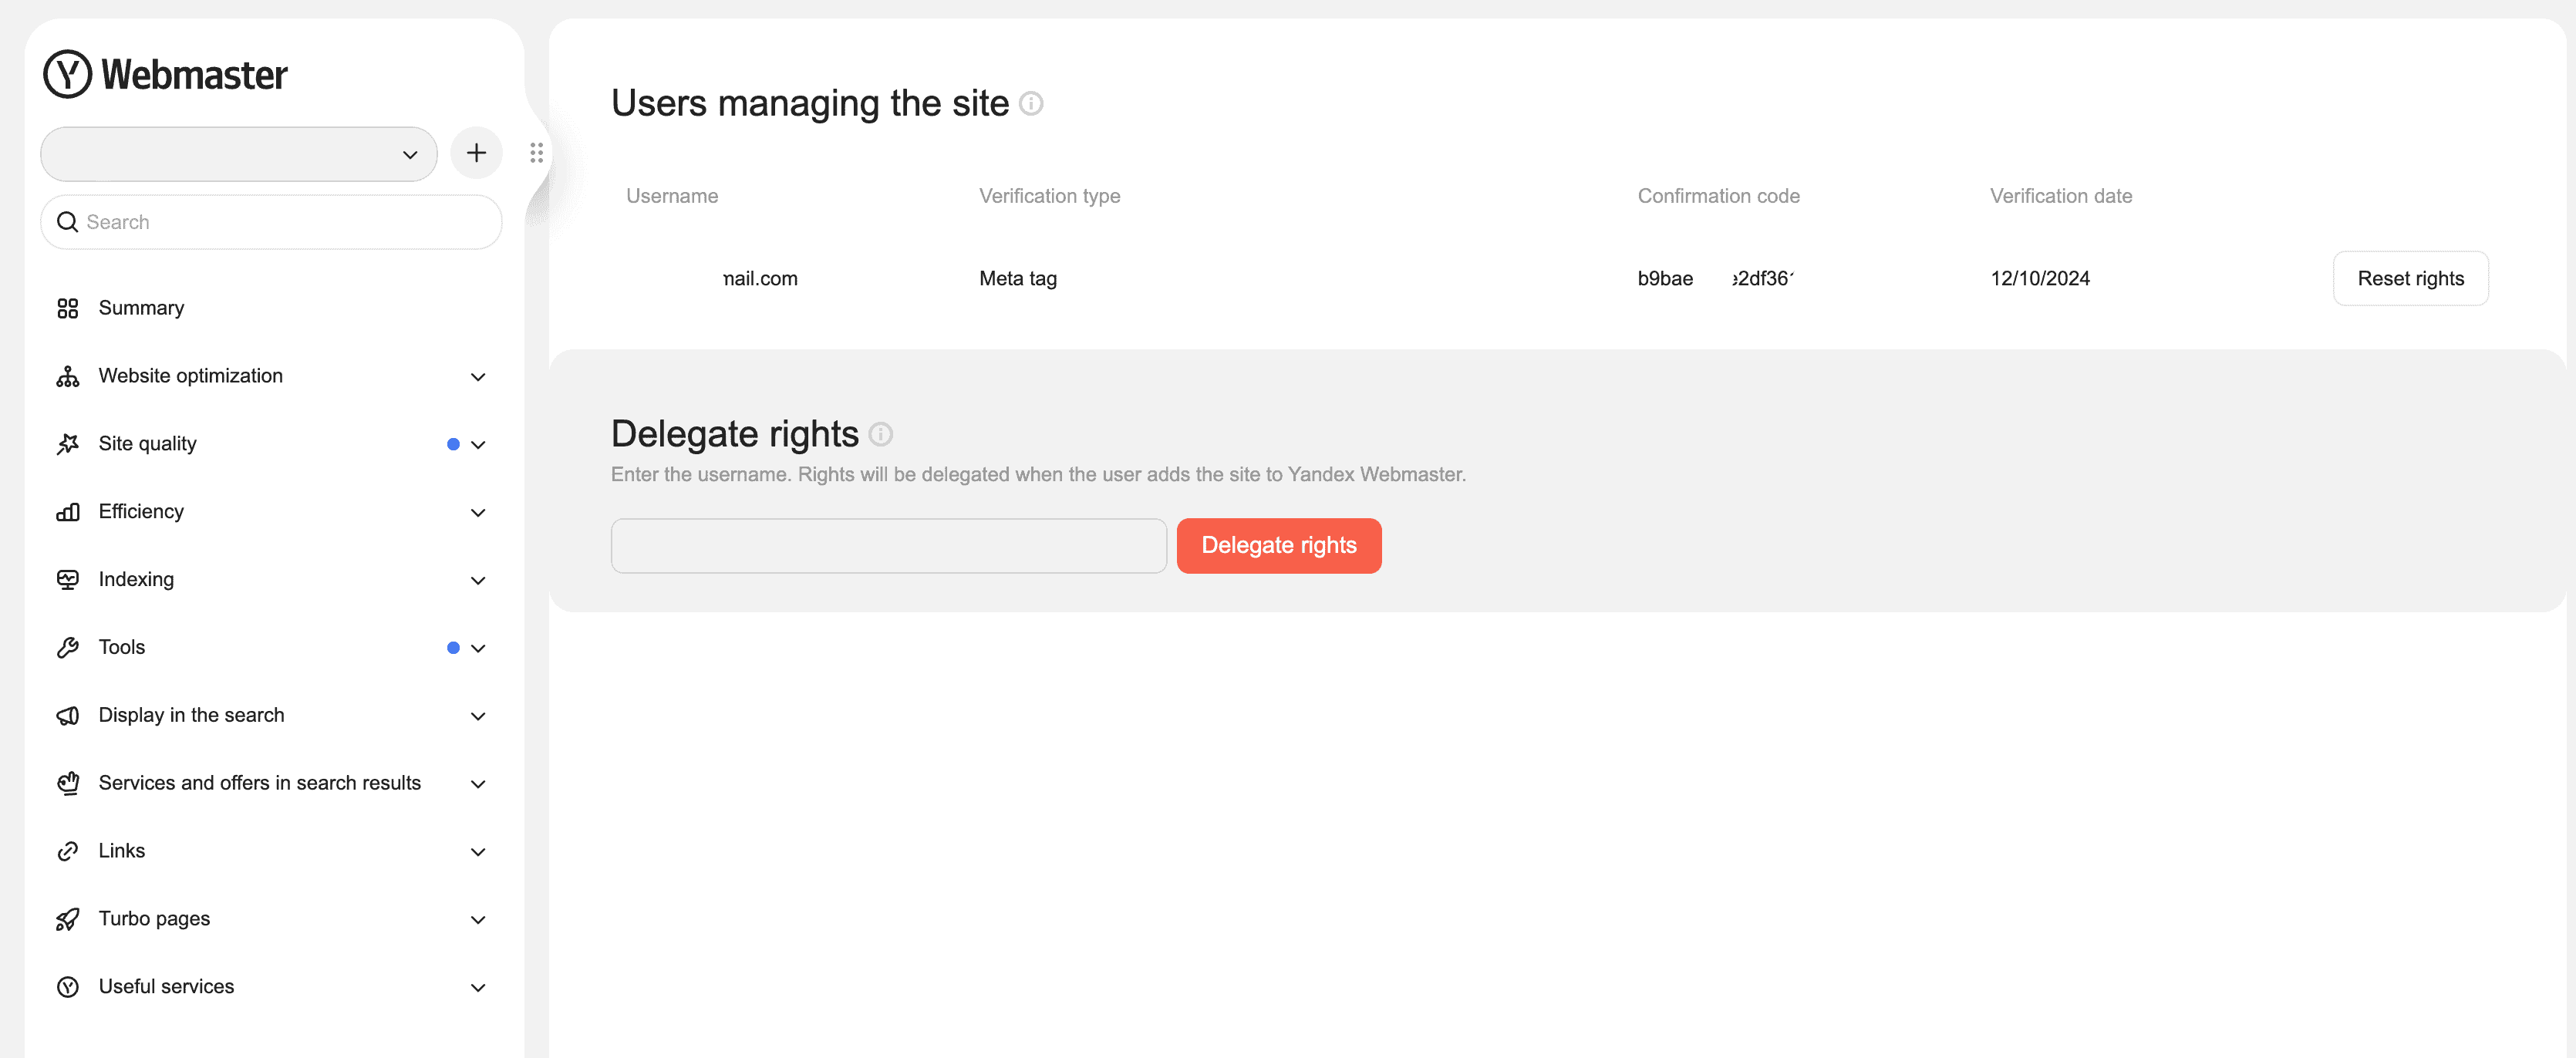
After adding the verification tag, return to Yandex Webmaster and click the Verify button.
If the tag has been added correctly, Yandex will redirect you to the Access Rights page, indicating that your site has been verified.
Step 3: Submit XML Sitemap to Yandex
Now that your website has been verified, you can submit your XML sitemap to Yandex. To do this, navigate to the Indexing section and click on Sitemap files.
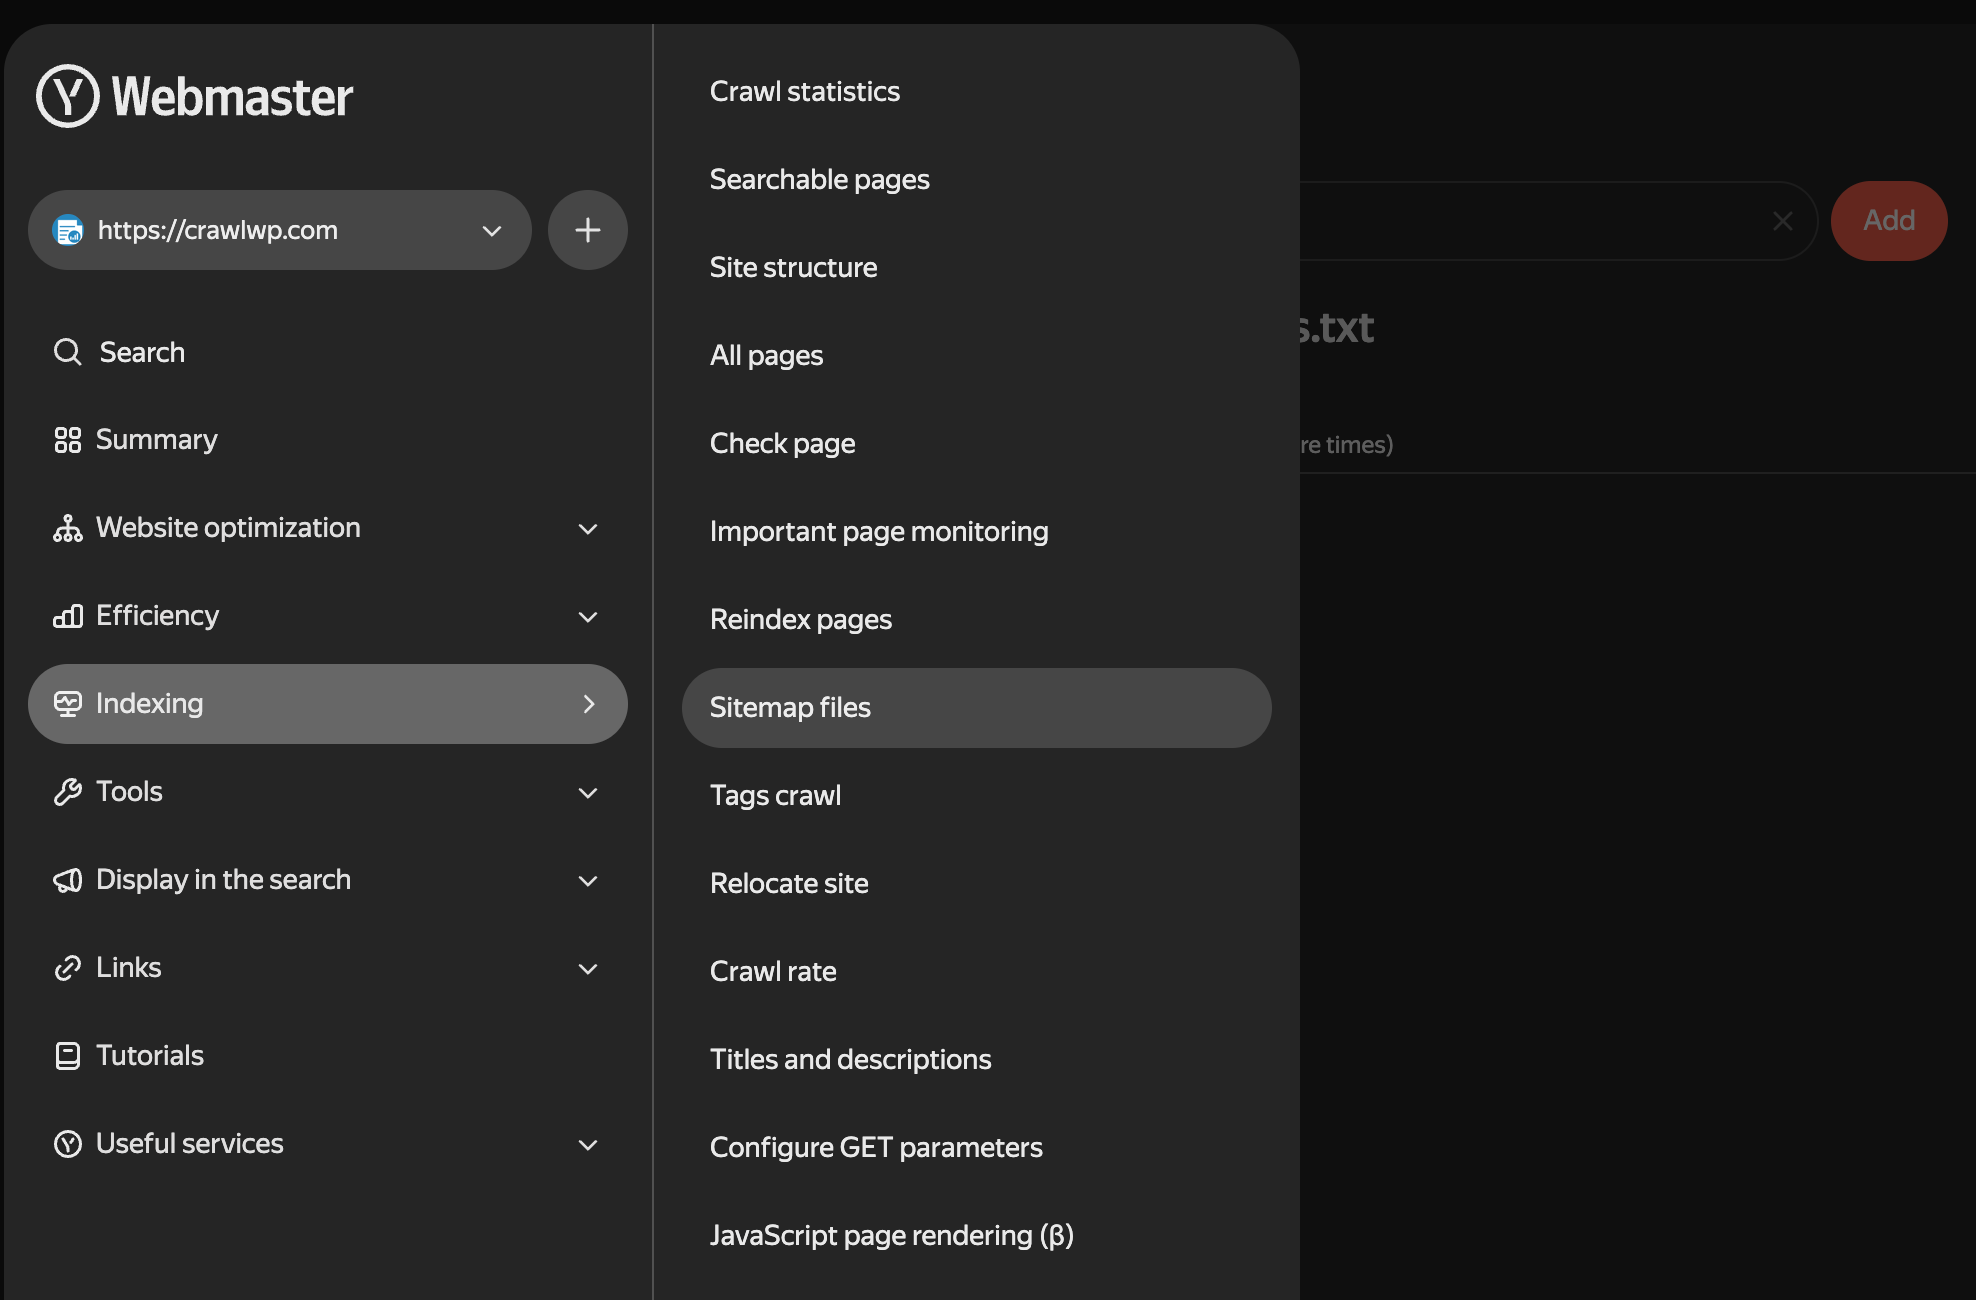
Next, enter your sitemap URL in the provided field.
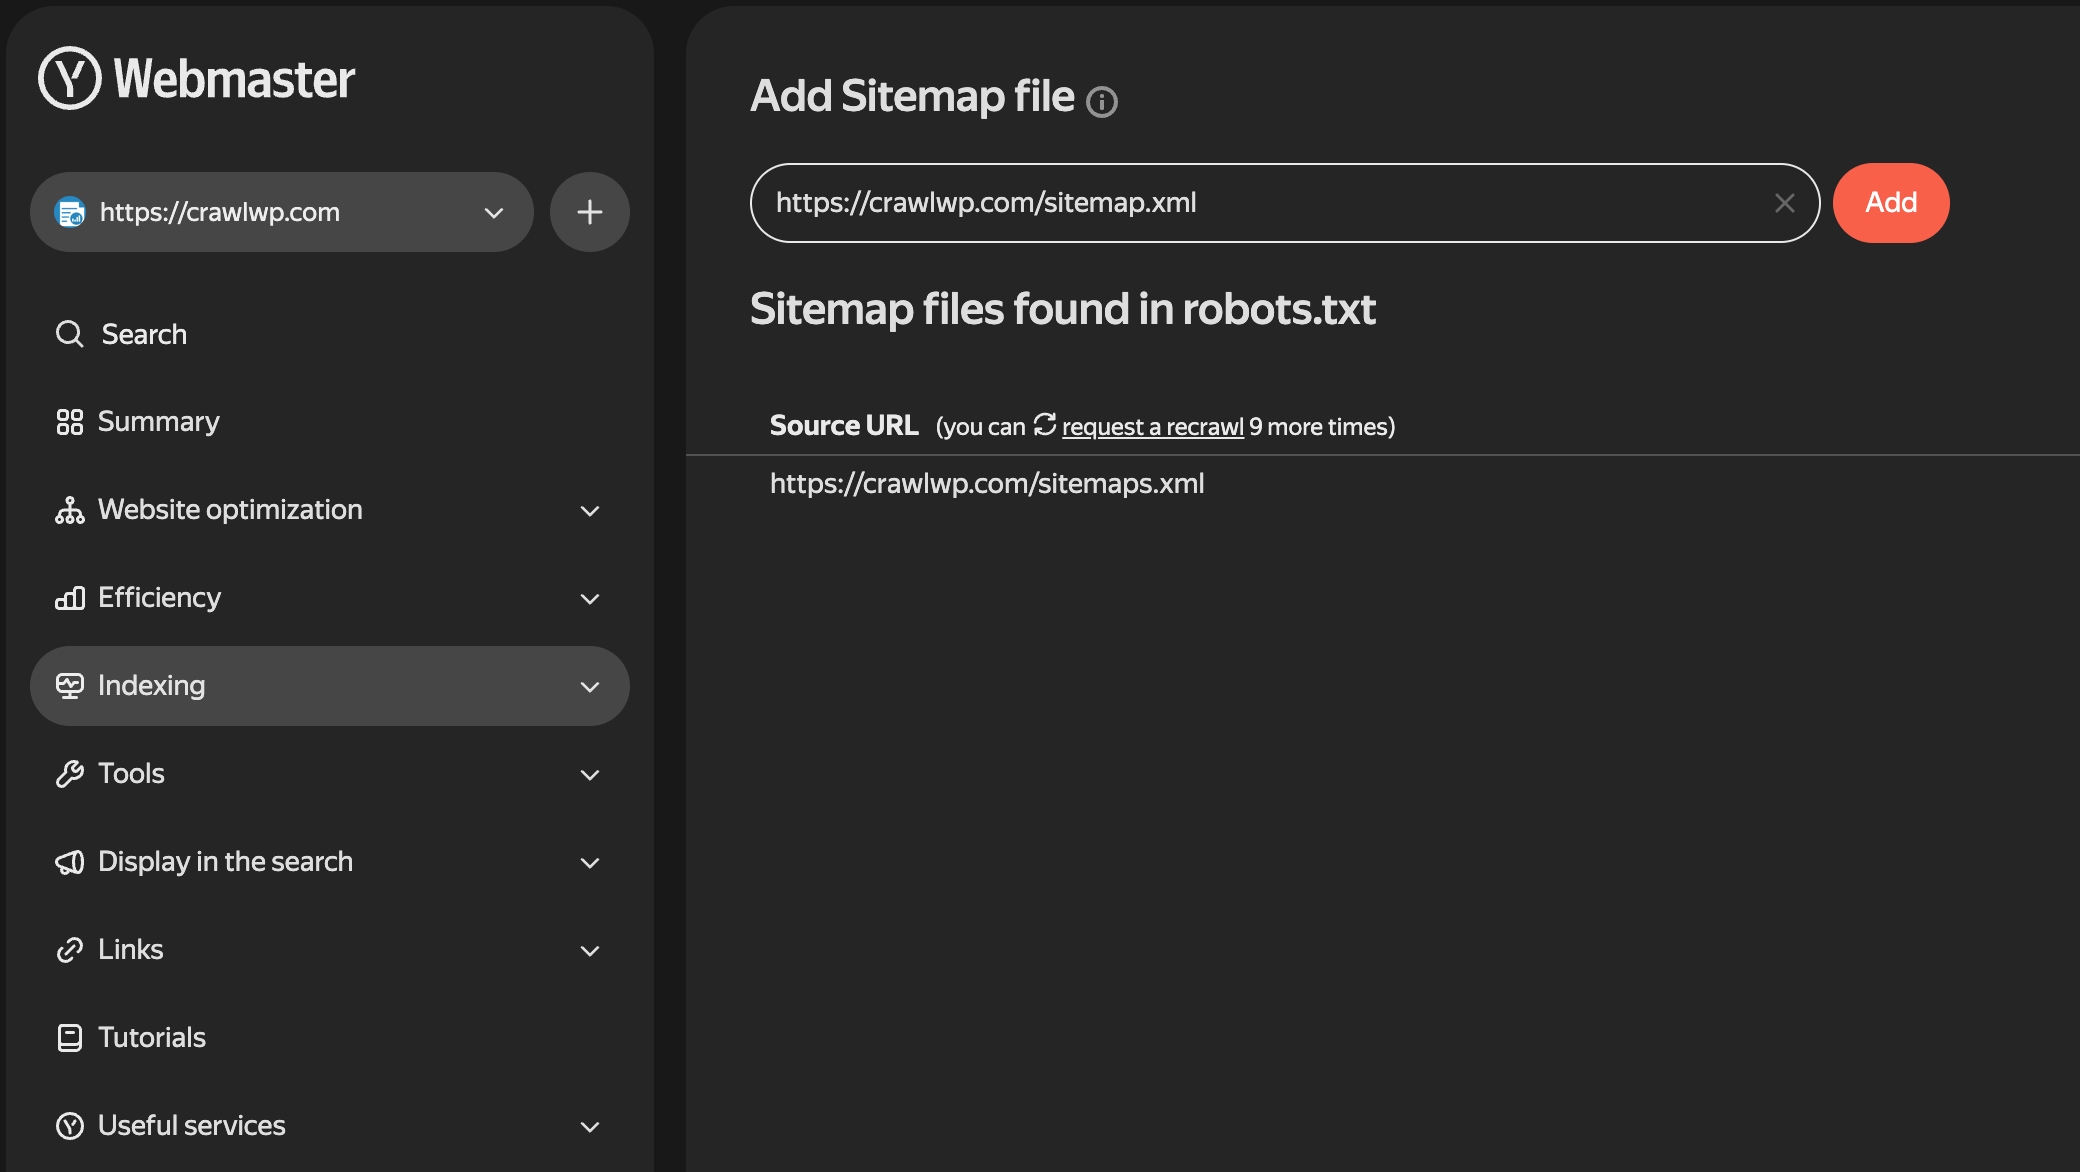
After entering your sitemap URL, click Add to submit your website XML sitemap to the Yandex search engine.
Common XML Sitemap Issues and How to Fix Them
Below are common XML sitemap problems you may encounter and how to resolve them.
1. Sitemap Cannot Be Found (404 Error): One of the most common sitemap issues is a 404 error, which means search engines cannot access the sitemap URL you submitted.
This usually happens when:
- The sitemap URL was entered incorrectly.
- Website changes affected your sitemap location.
For example, you may have submitted “https://example.com/sitemap.xml” but your actual sitemap URL is “https://example.com/sitemap_index.xml”.
To fix this issue, first check your sitemap URL by opening it directly in your browser. If the sitemap loads correctly, copy the exact URL and submit it again in your search engine webmaster account. If the sitemap does not load and your website is built with WordPress, check your SEO plugin settings and ensure the XML sitemap feature is enabled.
2. Sitemap Contains Invalid URLs: Your XML sitemap should only include URLs that are active, accessible, and intended to appear in search results.
Invalid URLs can appear when:
- A page has been deleted.
- A URL structure has changed.
- A website migration was completed incorrectly.
- Old content remains in the sitemap.
To fix this issue:
- Remove deleted pages from your sitemap.
- Set up redirects for changed URLs.
- Update your WordPress permalink settings.
- Regenerate your sitemap using your SEO plugin.
Most WordPress SEO plugins automatically update your sitemap when content changes, but it is still a good idea to review it after major website updates.
3. Robots.txt blocks Sitemap: Your robots.txt file controls how search engine crawlers access different areas of your website. If your sitemap or important pages are blocked, search engines may not be able to crawl them properly.
To check your robots.txt file, visit: “https://yoursite.com/robots.txt”
Look for rules that may prevent search engines from accessing your sitemap or website content. If you find any directives that block search engines from crawling your sitemap or important pages, remove them.
Once you’ve made the necessary changes, save your robots.txt file and test it by opening your sitemap URL in a browser to ensure it is publicly accessible.
You can also return to Google Search Console, Bing Webmaster Tools, or Yandex Webmaster and resubmit your sitemap if needed. After the search engines recrawl your website, the sitemap should be processed successfully.
4. Empty Sitemap: An empty sitemap means the sitemap file exists but contains no URLs for search engines to crawl.
This often happens on:
- Newly created websites.
- Websites with no published content.
- Websites where SEO plugin settings exclude all content types from the sitemap.
How to fix it:
- Publish at least one post or page on your website.
- Check your SEO plugin’s sitemap settings.
- Ensure posts, pages, products, or custom post types are included in the sitemap.
Once content becomes available, the sitemap should update automatically.
5. Sitemap Submitted Successfully, but Pages Are Not Indexed: This is perhaps the most misunderstood sitemap issue.
A successful sitemap submission does not guarantee that every page in the sitemap will appear in Search results. Search engines still evaluate each page individually before deciding whether to index it.
Reasons pages may not be indexed include:
- Thin or low-value content.
- Duplicate pages.
- Poor internal linking.
- Recently published content that hasn’t been crawled yet.
- Pages blocked by robots.txt or “noindex” rules.
How to fix it:
- Improve the quality and originality of your content.
- Add internal links that point to your important pages.
- Confirm that the page is not blocked by “robots.txt” or a “noindex” tag.
- Give search engines time to crawl newly published content.
If your pages are accessible and provide value to users, they are more likely to be crawled and indexed over time. Keep in mind that indexing delays are common, especially for new websites or recently published pages.
Tips to Get Your Content Indexed Faster
Submitting your XML sitemap is an important first step, but it is only part of the indexing process. Search engines still need to crawl your pages, evaluate their quality, and decide when to show them in search results.
Here are some best practices to help improve how quickly search engines index your content.
1. Build Internal Links to New Content: Internal links are a ranking factor that help search engines discover pages by creating paths between related content on your website. When you publish a new article or page, try linking to it from:
- Existing blog posts
- Category pages
- Resource pages
- Your homepage
- Popular articles that receive regular traffic
The more easily search engines can navigate to a page through your website’s internal link structure, the more likely it is to be discovered and crawled quickly.
2. Publish High-Quality Content: Search engines prioritize content that provides value to users. Pages that are thin, duplicated, or offer very little information may take longer to be indexed or may not be indexed at all.
To improve your chances of faster indexing:
- Write original content.
- Cover topics thoroughly.
- Keep information accurate and up to date.
- Avoid publishing multiple pages targeting the same search intent.
Google wants to index content that is useful and relevant to searchers, so quality remains an important factor in ranking and indexing.
3. Update Existing Content Regularly: Search engines revisit websites that show signs of activity more frequently than websites that rarely change.
Updating older content with new information, updated statistics, additional examples, and improved formatting can encourage search engines to crawl those pages again and reassess their relevance.
Regular updates also help ensure your sitemap contains fresh content signals.
4. Improve Your Website’s Loading Speed: Slow websites can reduce crawling efficiency, especially on larger sites.
Improve your website’s performance by optimizing images, enabling caching, choosing reliable hosting, and removing unnecessary plugins. A faster website allows search engine crawlers to process more pages during each visit.
5. Build Quality Backlinks: When reputable websites link to your content, search engines often discover your pages more quickly.
Focus on earning natural backlinks through useful content, guest posts, industry partnerships, and content that people want to reference. Quality backlinks can improve both content discovery and your website’s overall authority.
6. Use CrawlWP for Faster Indexing: Sitemap submission works by waiting for search engines to revisit your sitemap and discover changes on their own.
CrawlWP takes a more proactive approach by notifying search engines whenever content is published, updated, or deleted on your WordPress website. It integrates with Google’s Indexing API and the IndexNow protocol to instantly notify supported search engines (including Google, Bing, Yandex, Naver, Yep, and Seznam.cz) of content changes.
This means that instead of waiting for search engines to discover updates during their next crawl, your website can notify them immediately that something has changed.
CrawlWP also provides features such as:
- Automatic URL submissions to search engines for indexing after publishing or updating content.
- Manual search engine submission for specific posts and pages.
- Bulk URL submissions for search engine indexing.
- Indexing status monitoring.
- Indexing history reports.
- Google, Yandex, and Bing search performance insights directly inside WordPress.
For websites that publish content frequently, this can reduce the time between publishing and search engine discovery.
Frequently Asked Questions About XML Sitemap
Q1. Do I need to submit my sitemap to every search engine?
No, you don’t have to. However, submitting your sitemap to multiple search engines is recommended, as it helps each engine discover your new and updated content. While Google is the largest search engine, Bing and Yandex also drive traffic and provide webmaster platforms that help you monitor your site’s indexing and search performance.
Q2. Do I really need an XML sitemap for a small website?
Yes, and here’s why: even if your site only has five pages. An XML sitemap isn’t just about size; it’s about clarity.
Think of it as giving search engines a direct shortcut instead of making it wander through your menus. For new websites, small blogs, or niche portfolios, a sitemap helps search engines discover your content faster, especially when you don’t have many external backlinks pointing to your pages yet. So don’t skip it just because your site is small. Every little bit of SEO help counts.
Q3. Does submitting a sitemap guarantee my pages will get indexed?
I wish I could say yes, but unfortunately, no. Submitting your sitemap is like sending a formal invitation: Google receives it and acknowledges it, but ultimately decides whether to show up based on the quality and relevance of your content.
Your sitemap tells search engines, “Hey, please check these pages out.” But they will only index them if they meet its quality standards. So while a sitemap is essential, it works best alongside great content, good site speed, and a solid internal linking structure.
Q4. How often should I update or resubmit my sitemap?
Here’s some good news: you probably don’t need to do this manually at all. Most WordPress SEO plugins automatically update your sitemap whenever you publish, edit, or delete content. Search engines also check your sitemap periodically for new or updated pages, so manual resubmission is rarely necessary.
However, if you’ve just published time-sensitive content such as a product launch, breaking news story, or seasonal promotion, you may want to speed up the discovery process. In such cases, using CrawlWP can be an efficient solution.
CrawlWP automatically notifies search engines whenever content on your WordPress site is created, updated, or deleted. This means that instead of waiting for search engines to revisit your sitemap during their next crawl cycle, your website can proactively inform them that new content is available.
Q5. What’s the difference between XML sitemaps and HTML sitemaps?
An XML sitemap is designed for search engines. It’s a machine-readable file that tells Google exactly where your pages are and when they were last updated. An HTML sitemap, on the other hand, is for human visitors—a visual, clickable list of pages that helps users navigate your site. They serve completely different purposes, and you can have both. But for indexing purposes, the XML sitemap is the one that matters.
Conclusion
And there you have it. You now know how to submit your XML sitemap to search engines, including Google, Bing, and Yandex.
Let’s quickly recap what we’ve covered. We looked at what an XML sitemap does and why submitting it to multiple search engines can be useful. From there, we showed you how to find your WordPress sitemap URL and walked you through submitting it to Google Search Console, Bing Webmaster Tools, and Yandex Webmaster.
We also looked at some common sitemap problems, explained how to fix them, and shared a few practical ways to help search engines discover and index your content faster. Plus, we answered some of the most common questions WordPress users have about XML sitemaps.
Now, don’t just close this tab and forget about it. Take a few minutes to find your sitemap URL and submit it to the search engines that matter to your audience. It won’t take long, and it’s a small step that can help search engines find your content more easily.
And if you want search engines to discover your content even faster, use CrawlWP to automatically notify Google and other major search engines whenever content on your WordPress site is published or updated.